
Networks, Wi-Fi
Note: The following known wireless devices are not supported at SSU:
- Wireless Printers
- Google Chromecast
- Apple Airplay
- Routers
- Amazon Alexa or Echo
- Google Home
- Apple Homepod
- Smart Lightbulbs
Resources
SSU students, employees and others using SSU's computing and network services are expected to comply with CENIC's Acceptable Use Policy.
Guests of the university may receive Wi-Fi access through our ssu-guest Wi-Fi network. To connect to our guest Wi-Fi, follow the steps listed below. Once connected, you will have access to this network for 24 hours. After that time, you will be prompted to register once again.
Connecting to ssu-guest
- Select ssu-guest from your device's wireless menu.
- Launch your preferred web browser. The captive portal login page will load automatically.
- Enter your full name, email address, and accept the terms and conditions.
- If you've logged onto this network before, your email address will be your username and your password is the 6-digit code provided to you after your initial log-in.
- Press the button labeled register. From there you should be connected. If you face issues, follow the troubleshooting steps below.
Troubleshooting
I can’t see a wireless network.
- Verify that you have wireless enabled.
- If your device has a physical switch that turns the wireless on or off, ensure that it is switched to the "on" position.
I select ssu-guest, but nothing happens.
- Run Network Troubleshooting for your device.
- Clear your browser's cache and reload the web page.
- Ensure DHCP is enabled.
For assistance or questions, contact the IT Help Desk.
The pages linked below give step-by-step instructions for connecting to SSU WiFi networks on supported devices.
PDFs of these instructions will be found on the bottom of each page.
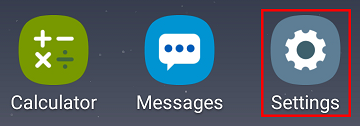
From the main Android Apps Menu, select Settings.
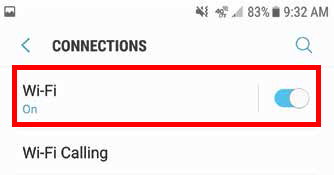
In the settings menu, navigate to “Connections”.

In the Connections menu, tap “Wi-Fi”.
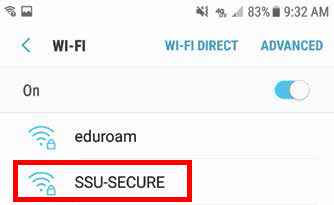
Select SSU-SECURE from the list of networks.
When the SSU-SECURE settings window appears, select the following information as seen in the image and click connect. Some options may not be available depending on your device’s OS.
EAP Method: PEAP
Phase 2 Authentication: MSCHAPV2
CA Certificate: Use system certificates
User Certificate: Unspecified
Online Certificate Status: Require certificate status
Domain: solar.sonoma.edu
Identity: Seawolf ID (Username)
Anonymous Identity: (Leave blank)
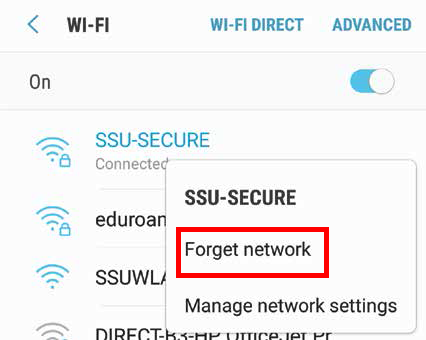
Password: SSU PasswordIf you’re having any difficulty connecting to the SSU-SECURE network, you may need to forget it then reconnect. To forget the SSU-SECURE network, navigate back to the networks menu and tap and hold the SSU-SECURE network. When another menu pops up, select Forget network.
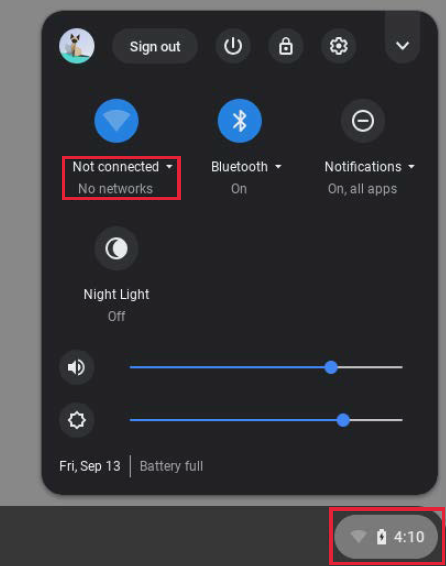
- At the bottom right of your screen, open the menu by clicking on the Wi-Fi symbol or by simply clicking on the time.
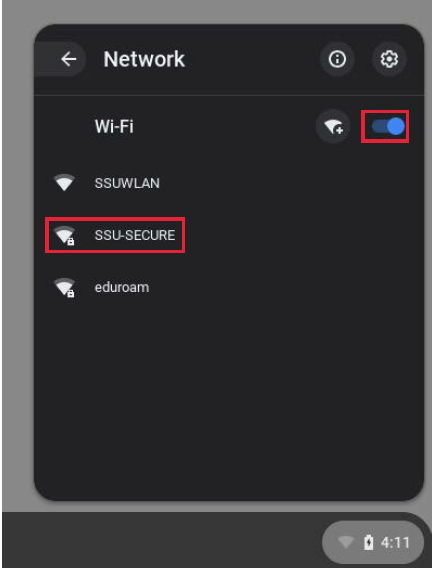
Click on Not Connected and make sure that Wi-Fi is turned on. (Note: If you see your Wi-Fi network name and a signal strength, your Chromebook is already connected to Wi-Fi.)
Find SSU-SECURE on the list and click on it.
On the Join Wi-Fi network screen that pops up, enter the following settings:
- EAP Method: PEAP
- EAP Phase2 Authentication: MSCHAPv2
- Server CA Certificate: Default
- Identity: SSU username
Note: It may be necessary to enter your username as SSU username@solar.sonoma.edu - Password: SSU password
- Domain: solar.sonoma.edu
Note: Only if requested or available: - Domain suffix match: sonoma.edu
Note: Only if requested or available: - Anonymous Identity: Leave blank
Note: If any value is present, remove it.
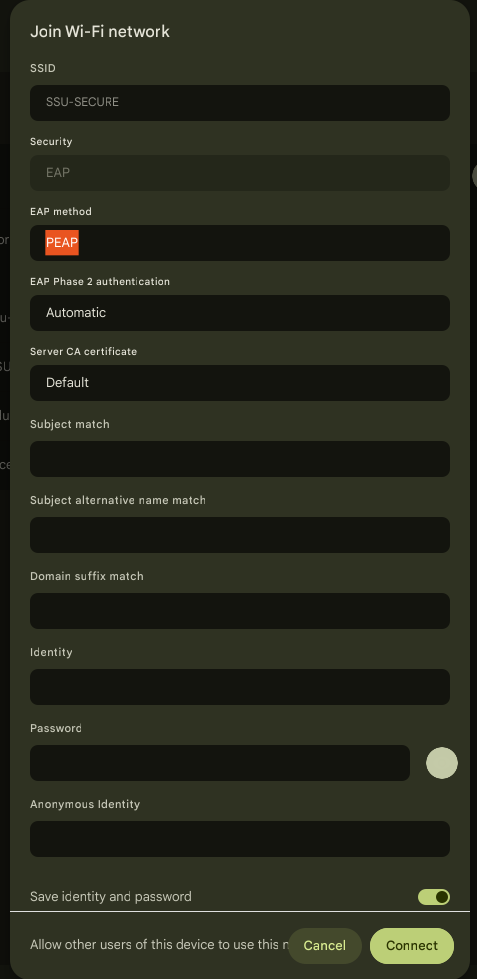
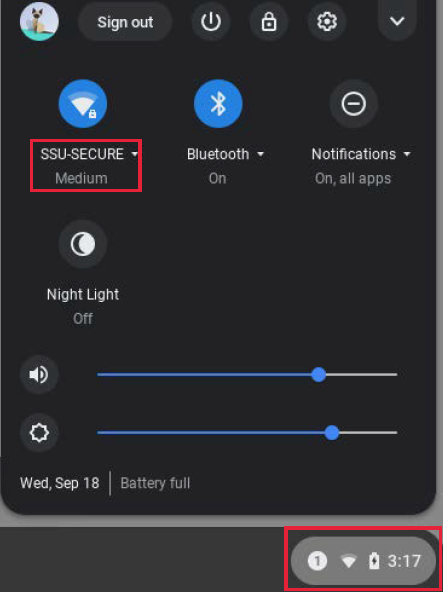
Click Connect. You should now be connected to SSU-SECURE!
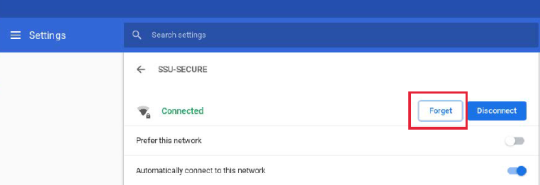
If you are having any issues connecting to SSU-SECURE or if your Chromebook says you are connected, but you do not have internet access, try forgetting the SSU-SECURE network.
Click on the time or Wi-Fi Symbol, then click on SSU-SECURE.
Click SSU-SECURE again to select the network.
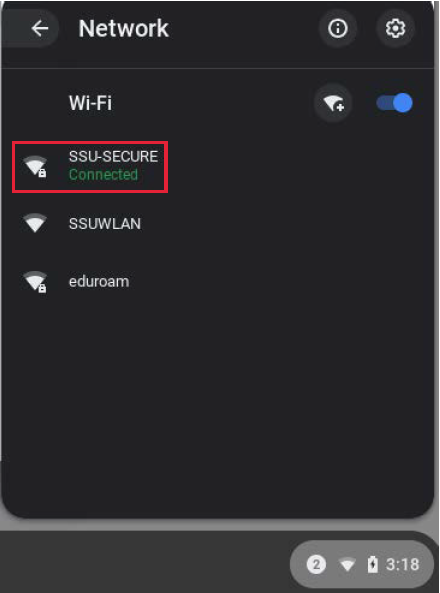
Click on the Forget button. Repeat steps 1-5 above to reconnect.
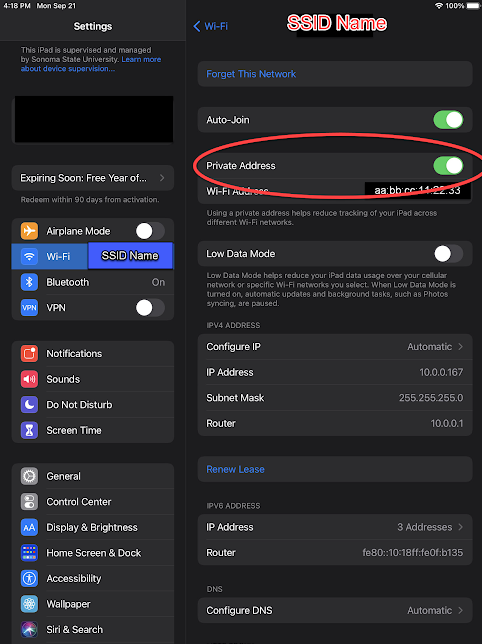
Important Note: In the latest update to IOS, Apple introduced a feature called "Private Address". This feature is turned on by default, and will prevent IOS devices from being able to connect to our Wi-Fi networks. If you have previously been able to connect to SSU-SECURE, and now cannot, despite following connection instructions below, you may be experiencing this issue. The resolution is to disable "Private Address" for the network you are trying to connect to. In the case of SSU-SECURE, enter Settings, go to Wi-Fi, tap the "i" icon next to SSU-SECURE, and turn off "Private Address". You should then be able to connect to the network. More info can be found here. If you have further difficulties, please contact the IT Help Desk for assistance.
SSU-SECURE Wi-Fi Connection Instructions
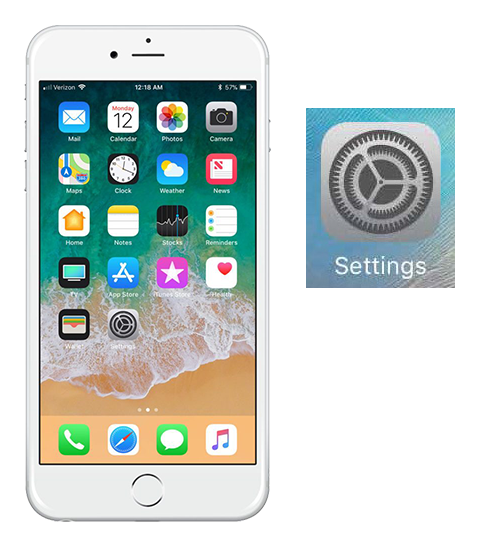
- On your home screen, choose the Settings app.
- Scroll down and tap Wi-Fi.
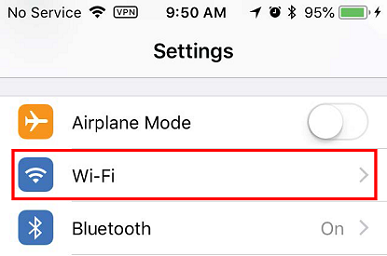
- Make sure that Wi-Fi is turned on and select SSU-SECURE from the list of networks.

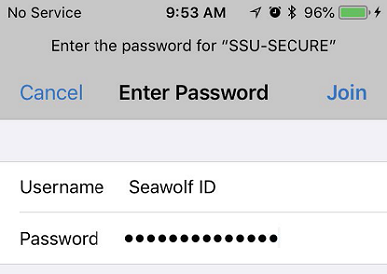
- Enter your Seawolf ID and password.
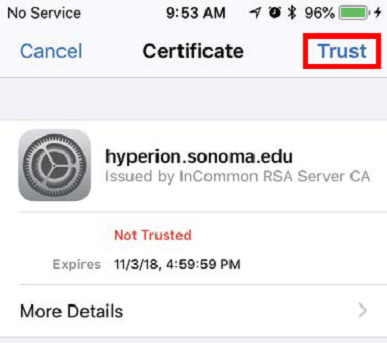
- Tap Trust in the top right corner to accept the certificate. You should now be connected to the network.
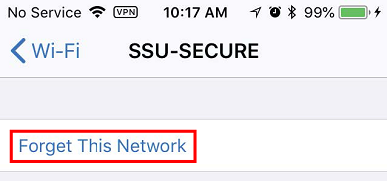
- If you are having any difficulties connecting to the Wi-Fi, you may want to forget the SSU-SECURE network then reconnect. To do so, navigate back to the list of networks and tap the “i” button to the right of SSU-SECURE.

- Tap to “Forget this Network” at the top and then tap “Forget” on the subsequent prompt. You have now forgotten SSU-SECURE and the credentials associated with it. Follow steps 1-5 above to reconnect.
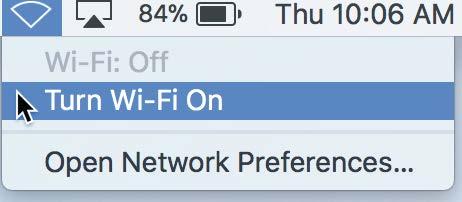
Open the wireless menu in top right corner and ensure that Wi-Fi is turned on.
Once you are connected to Wi-Fi, select the SSU-SECURE network.
You will be prompted to enter your credentials. Leave the mode set to “Automatic” and enter your Seawolf ID and password. (Remember that your SeawolfID is not your entire email, just the username.)
After successfully entering your credentials, you may be asked to verify the hyperion.sonoma.edu certificate. Click Continue.
Enter your computer login credentials and Update Settings. You should now be connected to SSU-SECURE.
If you are having any issues connecting to SSU-SECURE, you may need to forget the network then reconnect. To forget the wireless network SSU-SECURE, click the magnifying glass in the top right corner and type “System Preferences”. Highlight System Preferences and hit enter.
Select “Network” from the system preferences panel.
The Network preferences panel will open. Make sure you have highlighted “Wi-Fi” in the left sidebar. Then click the “Advanced” button in the bottom right corner of the menu.
In the Wi-Fi advanced menu, make sure you are in the “Wi-Fi” tab. Highlight the SSU-SECURE network under Preferred Networks. Click the minus button underneath Preferred Networks. You have now successfully removed the SSU-SECURE network. Click OK to finish. Follow steps 1-5 above to reconnect.
There are many types of operating systems and devices that have WPA2-Enterprise capabilities and may work with SSU-SECURE. Information required to configure a device to connect to SSU-SECURE using WPA2-Enterprise is listed below. If you require assistance configuring your device with these settings, consult the vendor-provided help for your device (ex: manual or website).
| Configuration | Setting |
|---|---|
| Wireless SSID | SSU-SECURE |
| Network Authentication | WPA2-Enterprise For devices where WPA2-Enterprise isn’t listed or doesn’t work, you can try 802.1x EAP |
| Data Encryption | AES |
| Authentication (EAP) Type | Protected EAP (PEAP) |
| Phase 2 Authentication | MSCHAPV2 |
| Username | Your Seawolf ID |
| Password | Your Seawolf ID Password |
| Domain | solar.sonoma.edu |
Not every device is capable of connecting to SSU-SECURE. If the above settings do not allow you to connect, we recommend that you use ssu-guest.
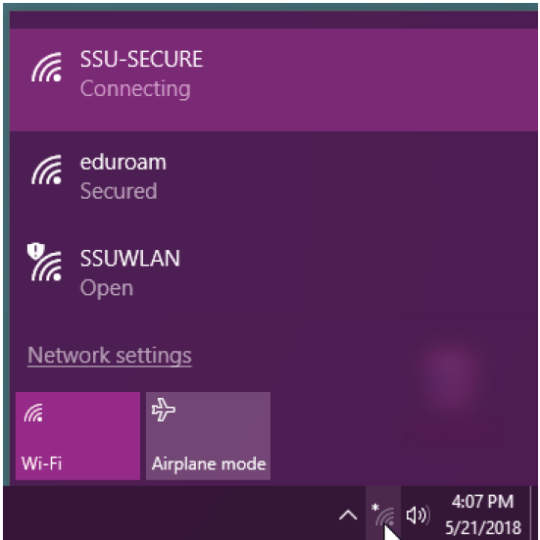
Make sure that your Wi-Fi is enabled, then click the Wireless Network icon in the bottom right corner of your desktop and choose to connect to SSU-SECURE.
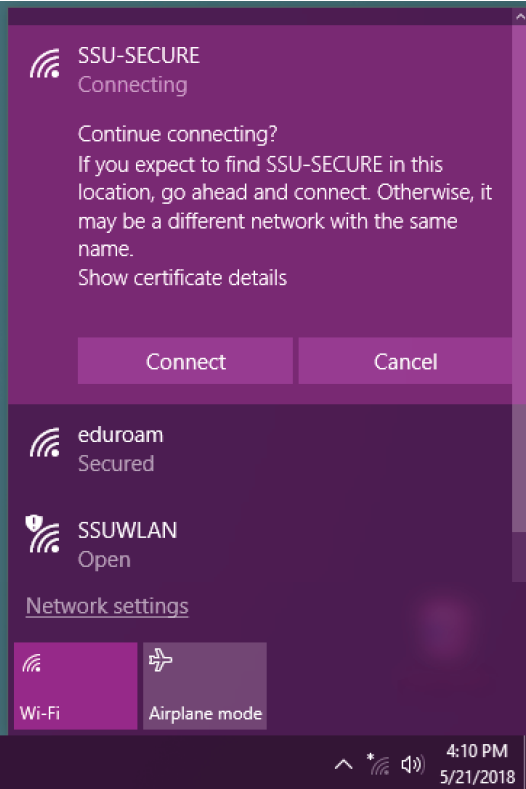
If prompted again to connect, go ahead and select Connect.
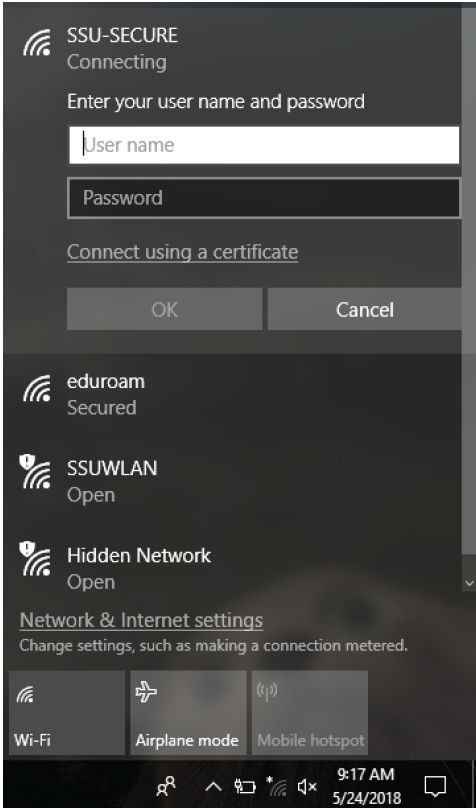
You will then be prompted to enter your SSU credentials. Enter your Seawolf ID as the user name and your Seawolf password in the password field.
- If you are asked, Trust the certificate. You should now be connected to the SSU-SECURE Wi-Fi network!
- If you are having difficulties connecting to Wi-Fi, you may need to forget the network. To do so, click the Network icon on the lower right corner of your screen, then select "Network & Internet Settings".
- On the Network & Internet Settings screen, select "Wi-Fi".
- On the Wi-Fi settings screen, select "Manage Known Networks".
- Under Manage Known Networks, select SSU-SECURE click "Forget"
- The wireless network profile is deleted. Follow steps 1-4 above to reconnect.
Approval from Network Services must be obtained before any network equipment (including wireless devices, hubs, bridges, switches, or routers) is hooked up to the network. If you need such a device, check with NSCS via email to Director_NTS@sonoma.edu. Commonly used workstations do not need approval from Network Services, provided that they do not function as network equipment.
Sonoma State University maintains a campus-wide data network designed to encompass computers in all campus departments and to support communications among them. The Network Services department is responsible for the installation and operation of that network and for the campus connections to regional and national networks via the Internet.
Eduroam provides on-campus Wi-Fi access to visiting faculty, staff and students from participating institutions utilizing their home institution credentials. It also provides SSU faculty, staff and students who will be visiting a participating institution the ability to connect to Eduroam while away.
When visiting Eduroam campuses
- Select eduroam from the list of available wireless networks detected by your device.
- Enter your normal SSU username in the form of seawolfID@solar.sonoma.edu. Logins will fail if "@solar.sonoma.edu" is not included.
- Use your normal Seawolf ID password.
Using Eduroam while visiting SSU
Campus visitors from Eduroam-participating institutions can simply select eduroam from their list of available wireless networks and log in using their institution's credentials. If you experience any issues with Eduroam while visiting SSU, contact your home institution's service desk.
Campus visitors not from a participating institution should use the ssu-guest wireless network.
Other Configuration Settings
Some devices, particularly those running the Android operating system, require additional settings to connect to Eduroam. Information required to configure a device to connect to Eduroam is listed below:
- Wireless SSID: eduroam
- Network Authentication: WPA2-Enterprise. If WPA2-Enterprise is not available, you can try 802.1x EAP
- Data Encryption: AES
- Authentication (EAP) Type: PEAP
- Phase 2 Authentication: MSCHAPV2
- Anonymous Identity: Leave blank
- Domain: Leave blank
The SSU-Blue wireless network allows IT-approved devices to connect to the SSU-Blue wireless network that cannot normally connect to SSU-SECURE (e.g, gaming consoles and smart TV's). The SSU-Blue wireless network is only available in the residence halls for actively enrolled students. Access is granted to the SSU-Blue wireless network once per academic year and will need to be renewed after the end of each spring term.
Please review the list of unsupported devices at the top of the Networks, Wi-Fi page before submitting a request.
To request access to the SSU-Blue wireless network, please fill out the SSU-Blue Activation service request form (Seawolf ID required).
You will receive an email to your SSU email account once your request is approved. Follow the instructions in the approval email to connect to the SSU-Blue wireless network. You will not need to enter a username or password.
SSU-Blue Support Policy
Sonoma State University Information Technology will make a best-effort to support student devices on the SSU-Blue wireless network.
Students can expect a maximum of 15 megabit download speed and 3 megabit upload speed. SSU IT validates wireless network performance using SSU networking devices. Personal devices that fail to reach these speeds while the network is otherwise performing as expected, are not under the purview of IT support.
When tested with SSU networking devices, if wireless service is consistent with the established standards of a maximum of 15 megabit download speed and 3 megabit upload speed, and your device is not meeting these standards, we will recommend replacing your personal device with a different model or device.
SSU IT cannot support all possible devices and reserves the right to deny access to the SSU-Blue wireless network. A list of known unsupported devices is available at the top of the Networks, Wi-Fi page.
SSU-SECURE uses WPA2-Enterprise to allow for a safe and secure connection to the campus wireless network. This network is available for current SSU students, staff and faculty.
Below are instructions on how to connect to SSU-SECURE with known supported devices and operating systems. For additional assistance, contact the IT Help Desk.
Supported Operating Systems:
Wi-Fi on Windows 10
Wi-Fi on Mac
Wi-Fi on iOS
Wi-Fi on Android
Wi-Fi on Chrome OS
Wi-Fi on Other Devices
Troubleshooting Tips
- You will need to update the password you use to connect to SSU-SECURE every time you update your Seawolf password
- Install driver updates and patches for your wireless device and operating system