
Computers, Software, Devices
How to Access and Install Microsoft Office
Students, Faculty and Staff at Sonoma State University have free access to Microsoft Office 365. Follow the steps below to sign in and install Microsoft Office on your personal device.
Step 1: Visit the Microsoft Office Portal
- Go to the Microsoft Office 365 Portal.
Step 2: Sign In with Your Sonoma State Credentials
- Email Address: Enter your Sonoma State email in the format uid@sonoma.edu (e.g., seawolfid@sonoma.edu).
Click Next.
Step 3: Authenticate via Online Services
- You will be redirected to the Sonoma State University login page.
- Username: Enter your Seawolf ID.
- Password: Enter your Seawolf password.
- Click Login.
- Complete MFA if required.
Step 4: Access the Install Option
Once logged in:
- On the Office 365 homepage, look for the Install Office button located under the "Office apps & devices" section.
- Click on Install Office.
Step 5: Download and Install
- Download: The Office installer will begin downloading automatically.
Install: Run the downloaded installer file. - Follow the on-screen instructions to complete the installation process.
Step 6: Sign In to Activate
After installation, open any Microsoft Office application (e.g., Word, Excel).
When prompted, sign in with your uid@sonoma.edu email and Seawolf password to activate the software.
Additional Information
- Included Applications: Word, Excel, PowerPoint, Outlook, OneNote, and more.
- Device Limit: Install on up to 5 PCs or Macs, 5 tablets, and 5 smartphones.
- Does not include webapp access or OneDrive.
Jump to:
- What is the Refresh Program?
- Who is eligible?
- How often is the refresh cycle?
- What are the computers offered?
- What are the hardware and software specifications of the computers being offered?
- What if I want something that is not on the standard option list?
- Can I keep my old computer as well as receive a new one?
- Who do I contact with questions regarding the Refresh program?
What is the Refresh Program?
In order to provide the campus with high quality equipment and appropriate support and security for the network and infrastructure, Sonoma State maintains a periodic Refresh Program for the campus community. The refresh program covers laptops and desktop computers provided to eligible staff and faculty by the university. Externally funded equipment or equipment provided by self support unit may be subject to campus cost recovery
Who is eligible?
Full-time, permanent staff as well as full-time tenured or tenure track faculty, are eligible for the Refresh program.
How often is the refresh cycle?
The campus refresh cycle is approximately every five years for all campus provided devices. Eligibility for a refresh is determined by the age of the computer, identified by its university property number. These timelines may vary based on the available budget, manufacturer’s product life cycle, or other similar needs that may arise.
What are the computers offered?
IT offers four standard computer options that meet the needs of most of the campus community: a Windows PC and an Apple Mac, each available as a desktop or laptop. Staff are provided with a standard Windows desktop or laptop. Faculty can choose between a Windows or Mac desktop or laptop, with alternative configurations based on specific business needs.
What are the hardware and software specifications of the computers being offered?
A current list of the standard hardware and software specifications for the offered computers can be found on our Workstation Hardware and Software page.
What if I need something that is not on the specification page above?
The selected computer options are designed to provide a reliable, long-lasting computing platform for the duration of the refresh cycle. These standardized configurations are essential to keep our equipment support program efficient and our technical support staff properly trained. If a user's computing needs vary to what these systems offer, please submit a request to IT with specific requirements. We will work to offer the best option possible to meet the user's needs. Custom configured equipment may need to be funded by the user department and may require exception approval from the appropriate administrator.
Can I keep my old computer as well as receive a new one?
Keeping the old computer after receiving a new one is not permitted. The old computer must be returned for evaluation. If it is still functional and supportable, it may be redistributed to users. Additionally, these computers are used to enhance department labs and address other campus needs.
Who can I contact with questions regarding the Refresh Program?
For any questions about the Refresh Program, feel free to contact theFor any questions about the Refresh Program, feel free to contact the IT Help Desk by phone, email, visit us in-person, or Submit a Ticket.
The following software and online applications are available to our campus community at no cost based on user type. For online services, log in using your @sonoma.edu email address.
Please contact the IT Help Desk for assistance with procuring and downloading software.
Free Student Software
- Adobe Creative Cloud Full Suite
- Equatio
- JMP
- JAWS, ZoomText, Fusion
- Mathematica
- Microsoft Office
- OrbitNote
- Read&Write
- SSPS (with special considerations)
Free Software Available to Staff/Faculty
- Adobe Creative Cloud Full Suite
- Adobe Acrobat Pro
- Camtasia
- Equatio
- JAWS, ZoomText, Fusion
- JMP Pro
- Mathematica
- Microsoft Office
- Snagit
- SSPS
- Read&Write
Free Cloud Applications Available if Provisioned
- If you are a new user, you will need to create a new account. (see step 5)
- Go to wolfram user portal (https://www.wolfram.com/siteinfo/) and enter your email address in the "Enter your institutional email address" field. Check the "I have read and agree to Wolfram's Privacy Policy checkbox. Click Continue.
- On the next page, select whether you are a student or faculty/staff.
- Next page, click on Get Mathematica Desktop.
- In the Sign In field put in your sonoma.edu email address or if you don't think you have a Wolfram ID, click on Create one.
- In the Wolfram Activation Key Request Form specify what department you are in. Then select a product and version and click on Submit.
- You will be taken to a page with your activation key. An email will also be sent to your Sonoma State University email address.
- You can click the "Product Summary page" link or the link in your email to be taken to the downloads.
- Scroll down to “Downloads” and find your OS listed under “Standard Download”. Click the download button adjacent to your desired platform.
- This will download the Download Manager file for the corresponding operating system.
- Follow the remaining steps for your operating system.
Windows
- Run the Download Manager and keep all of the default settings and click [Next].
- Once the Download Manager finishes click [Launch]. This will launch the installer.
- Leave all settings at the default and proceed through the installer, clicking the [Install] button at the end.
- When it is finished installing leave the "Launch Wolfram" box checked and click [Finish].
- The Wolfram Product Activation will launch. You can click the [Continue >>] button under "Sign In to Activate Your Product".
- It will launch a browser window. If you are still logged in, you will be prompted to activate Mathematica. Otherwise login and you will be prompted to activate Mathematica.
- Accept the terms of Wolfram's License agreement and the product will launch.
macOS
- Launch the Apple Desktop Image file containing the Download Manger.
- Run the Download Manager and keep all of the default settings and click [Next].
- Once the Download Manager finishes click [Launch]. This will launch the installer.
- Leave all settings at the default and proceed through the installer, clicking the [Install] button at the end.
- When it is finished installing click [Close]. It should launcha window that will allow you to drag the "Wolfram" (Mathematica) application to your Applications folder.
- Launch the application from the Applications folder.
- The Wolfram Product Activation will launch. You can click the [Continue >>] button under "Sign In to Activate Your Product".
- It will launch a browser window. If you are still logged in, you will be prompted to activate Mathematica. Otherwise login and you will be prompted to activate Mathematica.
- Accept the terms of Wolfram's License agreement and the product will launch.
Adobe Creative Cloud includes applications for a wide variety of purposes, including PDF editing, video production, photo editing, web design, and much more. Visit Adobe Learn for more information and for free tutorials in the Adobe Digital Academy.
If you do not have Adobe Creative Cloud installed on your computer, visit Install Adobe Creative Cloud Desktop | Information Technology at Sonoma State University to complete the installation before continuing.
(Note for Mac users: Creative Cloud applications require Mac OS 10.13 High Sierra or later. Apple provides instructions to determine which Mac OS version you are running.)
- Open Creative Cloud.
- You may have an Adobe Creative Cloud shortcut on your desktop. If so, double-click that. If not, launch Creative Cloud using the following instructions.
- On a Mac, open your Applications menu, then find and launch Adobe Creative Cloud.
- On a Windows PC, click the Start Button (Windows logo), then find and launch Adobe Creative Cloud.
- You may have an Adobe Creative Cloud shortcut on your desktop. If so, double-click that. If not, launch Creative Cloud using the following instructions.
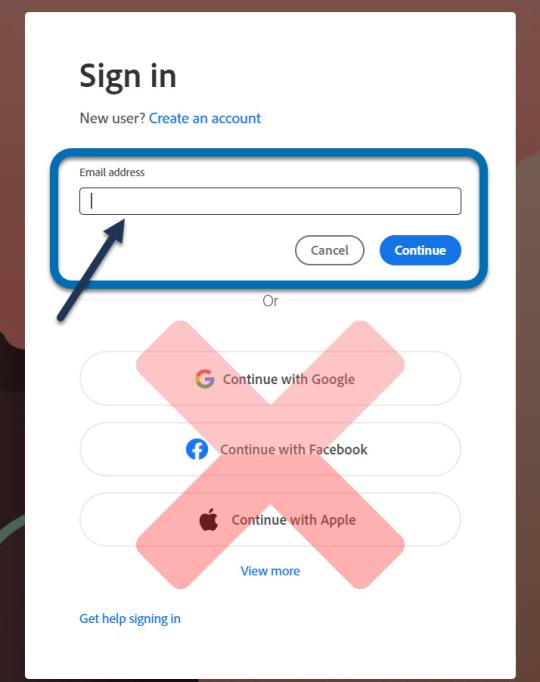
If you are not logged in, enter your @sonoma.edu email in the "Email address" box and click Continue.
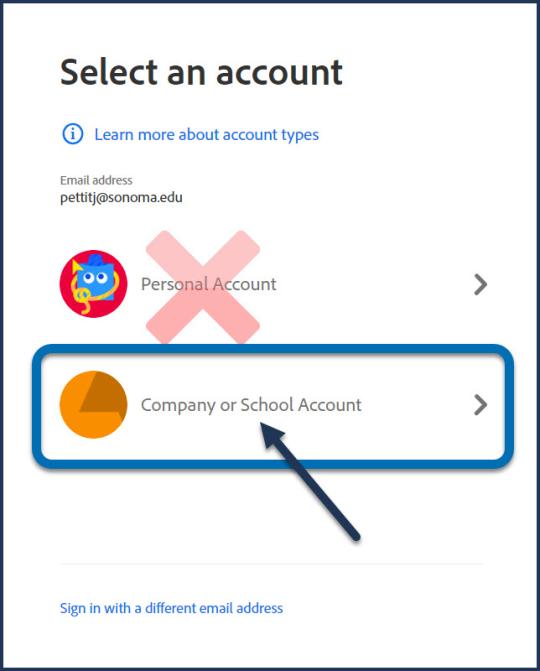
If prompted, select "Company or School account." (It won't work if you select "Personal Account" because the license is tied to your @sonoma.edu email account.)
- Log in with your SSU credentials on the Sonoma State Online Services page.
- Once Creative Cloud is open, go to the "Apps" section. Find the app you want to use. Click "Install," and Creative Cloud will install the app automatically.
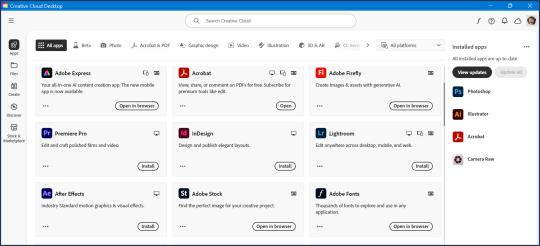
- From Creative Cloud, you can also open any installed app or open online Adobe tools in a browser.
Please follow the instructions below to enable access to Creative Cloud Desktop Apps on your personal device.
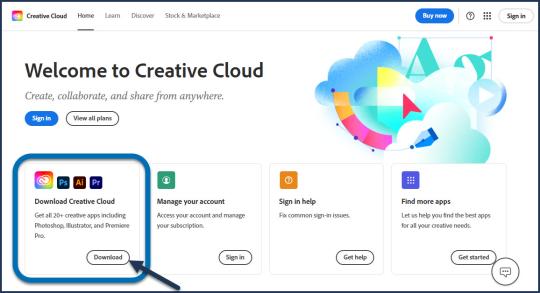
Visit Adobe Creative Cloud online and select Download Creative Cloud. This will start a download of the Creative Cloud installation file.
- Once the download is complete, open the file. (This will run an installation program for Creative Cloud.)
- If prompted, select yes, allow this app to make changes to your device.
- Open the Creative Cloud Desktop app when installed.
Enter your @sonoma.edu email in the "Email address" box and click Continue.
If prompted, select "Company or School account." (It won't work if you select "Personal Account" because the license is tied to your @sonoma.edu email account.)
- Log in with your SSU credentials on the Sonoma State Online Services page.
- Select the apps you want to install by clicking the "Install" button.
- Once installed, you can launch Adobe apps from either your application menu or from within the Creative Cloud app. You can also launch web-based apps like Firefly and Express from the Creative Cloud app.
The Creative Cloud app will run in the background and automatically prompt you to update your installed apps when new versions are released.
For information from Adobe on downloading and installing apps, see Download and Install Creative Cloud apps.
Information Technology provides web and video conference capabilities, and phone service, to Sonoma State University powered by Zoom. In our accompanying Zoom Web & Video Conferencing page, we provide general information and describe accessing your Zoom account profile via the Zoom tile in Online Services. In our Zoom Phone Overview and Zoom Phone FAQ pages, we provide general information and describe using the Zoom client phone functionality, as well as describe how to migrate from a physical Avaya phone to a Poly phone. Your Zoom profile is where you can schedule meetings, change settings, access recordings, listen to voicemail, and more. It is important to differentiate between the Zoom "profile" accessed via Online Services, and the Zoom "application" that is installed on your computer. The Zoom application is where meetings are actually conducted and phone service is utilized. Within the application, you have access to some of the same functionality as your Zoom profile (settings, schedules, voicemail, etc.), but the profile is more comprehensive. Most importantly, logging into your Zoom profile does not log you into the Zoom application automatically (ex: using the Zoom tile in Online Services). Similarly, initiating a meeting from your Zoom profile does not transfer your login credentials into the Zoom application. It is possible to be logged into the application with a different account than your Zoom profile, such as a personal account, thereby potentially causing issues. It is very important to understand how to log into the Zoom application with the desired Zoom account.
The following example demonstrates logging into the Zoom application with your Sonoma State Zoom account.
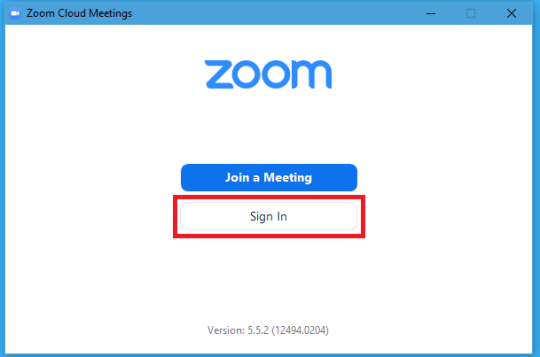
- Open the Zoom application.
- You may have a Zoom shortcut on your desktop. If so, double-click that. Alternatively, you may have a Zoom shortcut on your dock or task bar. If so, click that. If not, launch Zoom using the following instructions.
- On a Mac, click "Finder" at the bottom left of your dock, then click "Go" at the top of the screen. Select "Applications" then launch Zoom.
- On a Windows PC, click the Start Button (Windows logo) on the bottom left of your task bar, then launch Zoom.
- On a Chromebook, first ensure you have installed the Zoom app from the Chrome Web Store. (Note that the alternative Android version of Zoom from the Play Store may not allow you to log in properly. The Zoom Chrome app is preferable.) Next go to your App Launcher, and select Zoom. (The following screenshots will differ from your version but the process is nearly identical. Please see Zoom's Chrome OS support page or their blog for more info.)
- On an Android phone or tablet, or iOS device (i.e.. an iPhone or iPad), install the Zoom app from the Google Play Store or Apple App Store. Open the Zoom app and sign in following steps 2-5 below (Screenshots will differ, but the process is similar. Please see Google and Apple's support pages for general app installation help.)
- You may have a Zoom shortcut on your desktop. If so, double-click that. Alternatively, you may have a Zoom shortcut on your dock or task bar. If so, click that. If not, launch Zoom using the following instructions.
- Once the Zoom application launches, if you are not already logged in, select Sign In.
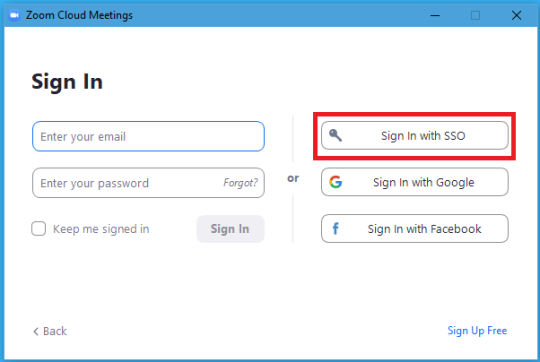
- At the "Sign In" screen, select Sign In with SSO.
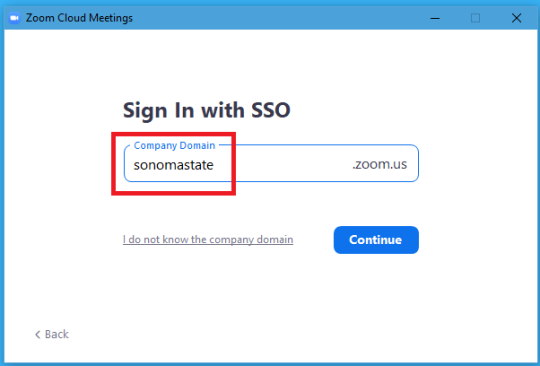
- At the "Sign In with SSO" screen, type sonomastate (if it is not already populated), and click Continue. (If you arrive at a screen titled "Search company domain", simply select "I know the company domain" below first.)
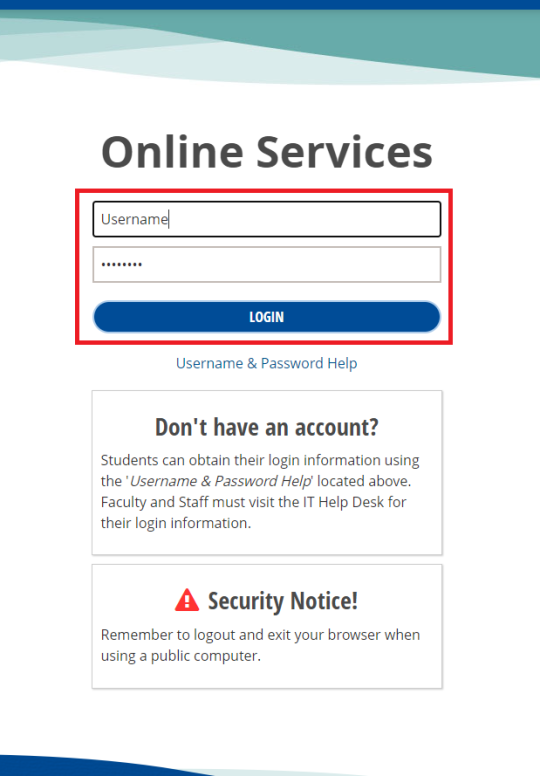
- You should now be taken to the SSU Online Services screen. Sign in with your Sonoma State user ID and password.
- The Zoom app may launch and finish logging you in automatically. If not, select Launch Zoom. If a small "Open Zoom Meetings?" window pops up, select Open Zoom Meetings.
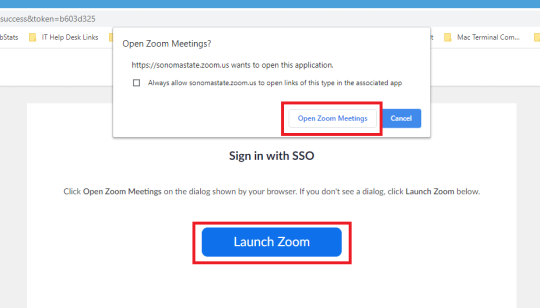
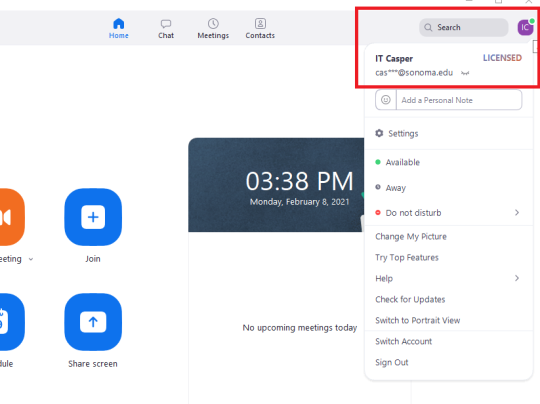
- The Zoom application should now open. To confirm you are signed in, click the image or initials icon that represents you in the upper right corner. The menu that pops out will display your name and the email account you are signed in with. If you are staff, current faculty, or an enrolled student, you should see the word "Licensed", indicating you have a Pro Zoom account.
This same menu also provides important options for accessing settings, checking for updates, signing out, switching accounts, and more.
If you have any questions or need assistance, please contact the IT Help Desk.
Luxer One lockers provide a convenient and efficient solution for managing equipment pick-up and drop-off needs at the IT Help Desk. Designed to facilitate smooth transactions especially during off-hours, these lockers are ideal for students, faculty and staff who require flexibility in accessing IT equipment. Whether it's picking up a laptop after repair or returning borrowed computing equipment, the Luxer One lockers offer a secure and accessible option, ensuring that your time constraints from our operating hours are not a constraint on transferring equipment.
Account Setup
To begin using Luxer One lockers, you must first set up a personal account. This process is simple and we have provided detailed instructions on our Luxer One Locker Account Creation website.
How to Drop Off Equipment
To drop off equipment using the lockers, please follow these steps.
- Contact the IT Help Desk and coordinate the creation of a ticket for your device. Provide details about the equipment and the reason for the drop-off.
- If you have not already done so, create a Luxer One account following the instructions listed above.
- Head to the Luxer One lockers located outside Salazar Hall.
- At the locker kiosk, select the 'Drop-off' option on the screen.
- Follow the prompts to input your Luxer One account and select “Sonoma State Help Desk” when selecting who the drop-off is for.
- A locker will open and you can place your item inside.
- Ensure the locker is securely closed and your transaction is completed on the kiosk.
- You'll receive a confirmation email once the drop-off is successfully recorded. You will receive another confirmation email once the item has been retrieved from the locker by an IT staff member.
Information About Computer Pickup
To pick-up equipment from the lockers, please follow these steps.
- Coordinate with a technician via the ticketing system to place your equipment in the lockers.
- If you have not already done so, create a Luxer One account following the instructions listed above.
- Once IT services have completed work on your device, they will securely place it in a Luxer One locker.
- You'll receive an email notification from Luxer One with a unique pickup code or QR code.
- Visit the lockers at your convenience, and at the kiosk, select 'Pick Up'.
- Enter your code or scan the QR code to unlock the appropriate locker.
- Retrieve your device and ensure the locker is securely closed.
- To ensure that you can utilize the computer off-campus, please sign into the device before leaving campus with the equipment.
- In case of any issues during pickup, contact the IT Help Desk immediately for assistance.
Transcript
- Login to your macOS workstation with your campus credentials
- From the "Go" dropdown menu, select Applications
- Scroll down to and Open the Self Service Application
- Select the "NOMAD Install" icon
- Select Install
- The install process will run automatically for about 30 seconds
- Your workstation will restart and return you to the updated login screen
- Login to your macOS workstation with your campus credentials
iPad
- Visit your iPad's App Store and search for Read&Write for iPad by Texthelp ltd. Install the free Read&Write app.
- Launch the Read&Write app and go into the Settings. Click Enter Serial.You'll need to copy and paste the serial number to activate the product.
- Serial: 439295835876447632
- Once you've activated the product, you'll need to add the keyboard and speech settings.
Installing the Read&Write for iPad Keyboard
- Go to your iPad's Settings
- Tap General and then Keyboard
- Tap Keyboards and then select Add New Keyboard
- Select Read&Write and then select Read&Write Keyboard
- Switch on Allow Full Access
Text to Speech
To hear text read back to you, you'll need to turn on Speak Selection in your iPad's settings
- Go to your iPad's Settings
- Tap General and then Accessibility
- Tap Speech
- Switch on Speak Selection
- Tap Voices to select the language, region, and speaker
Android Tablet
- Visit your tablet's App Store and search for Read&Write for Android by Texthelp ltd. Install the free Read&Write app.
- The first time you run Read&Write for Android, you will be shown a Setup Wizard.
- Detailed instructions for navigating the Setup Wizard can be found here.
- The Setup Wizard will give you the option to activate the product either with a serial number or by signing into Google. You must activate using a serial number.
- Serial: 439295835876447632
Note: In order to use the VPN client, the user must be set up with the Duo multi-factor authentication.
How to Install VPN
-
As an administrator of your computer, open a web browser and go to https://vpn.sonoma.edu.
-
You’ll be asked to authenticate through our Online Services. Put in your user ID and password.
-
At the Palo Alto Networks Global Protect portal, click on the download link of your choice to download the VPN client. (For the majority of PCs, you would choose Windows 64 bit.)
-
Run the GlobalProtect installation file you just downloaded.
How to Connect to VPN
- Once the application is installed, the window below will appear. In the blank field, type vpn.sonoma.edu and click on Connect
- You’ll be asked to authenticate again.
- A new icon for GlobalConnect will appear in the system tray, indicating that you are connected.
- A message saying "Welcome to Sonoma State Networks" will pop up to confirm your connection. You have to close it otherwise it will remain in the bottom right corner.
How To Disconnect from VPN
Note: In the event that the VPN connection is enabled but not connected, the application will repeatedly pop up to indicate that you need to connect. To remove that constant reminder, disable the VPN.
- To disable the VPN, click on the Global Protect icon in the system tray and click on the “gear” symbol on the top right of the GlobalProtect window.
- There you’ll see a choice to disable the VPN.
- The icon below located in your system tray indicates that the VPN is now disabled.
- To re-enable the VPN connection, click on the icon and choose Enable.
Make VPN Icon Visible in System Tray
- If you’d like to see the VPN icon on the taskbar, click on the Windows Start icon on the bottom left side of the desktop.
- Type Settings and then click on Settings to enter that environment.
- Click on Personalization and then, in the side-menu, click on Taskbar.
- Scroll down to and click on "Select which icons appear on the taskbar".
- At the Global Protect client icon, click the slider to select "On".
NOTE: In order to use the VPN client, the user must be set up with the Duo multi-factor authentication.
How to Install VPN
- As an administrator of your computer, open a web browser and go to https://vpn.sonoma.edu.
- You’ll be asked to authenticate through our Online Services. Put in your user ID and password.
- At the Palo Alto Networks Global Protect portal, click on the download link "Download Mac 32/64 bit GlobalProtect agent".
- Run the GlobalProtect installation file you just downloaded.
How to Connect to VPN
- Once the application is installed, the window below will appear. In the blank field, type vpn.sonoma.edu and click on Connect.
- You’ll be asked to authenticate again.
- The icon below will appear in your menu at the top of your screen, indicating that you are connected.
- A message saying "Welcome to Sonoma State Networks" will pop up to confirm your connection. You have to close it, otherwise it will remain on your screen.
Note: In the event that the VPN connection is enabled but not connected, the application will repeatedly pop up to indicate that you need to connect. To remove that constant reminder, disable the VPN.
- To disable the VPN, click on the Global Protect icon in your menu bar and click on the “gear” symbol on the top right of the GlobalProtect window.
- Click on Disable.
- The greyed-out icon indicates that the VPN is now disabled.
- To re-enable the VPN connection, click on the icon and choose Enable.
Note: You may see an alert indicating the computer’s antivirus needs to update its definitions or indicating that there is no antivirus software installed. On a state-tagged computer, your VPN connection will continue to work in spite of the alerts. On a non-state-tagged computer, you may be prevented using the VPN until the issue is rectified.
Software Standards
Core Software Applications - Faculty Workstations
This is a list of software installed on standard Faculty workstations delivered by IT.
Macintosh - MacOS Sonoma (14) and Newer
- Adobe Acrobat Reader DC
- Adobe Creative Cloud Application Manager
- Audacity
- Camtasia
- Chrome
- Firefox
- Google Drive
- iTunes
- Java
- Microsoft Office - Word, Excel, PowerPoint & Outlook
- Read&Write
- Safari
- Snagit
- SSU PowerPoint Templates
- VLC
- Zoom
Windows 11 Education
- 7-Zip
- Adobe Acrobat Reader DC
- Adobe Creative Cloud Application Manager
- Chrome
- Edge Chromium
- Firefox
- Java
- KeePass
- Microsoft Office - Word, Excel, PowerPoint & Outlook
- Notepad++
- VLC
- Zoom
Core Software Applications - Staff Workstations
This is a list of software installed on standard Staff workstations delivered by IT.
Macintosh - MacOS Sonoma (14) and Newer
- Adobe Acrobat Reader DC
- Adobe Creative Cloud Application Manager
- Audacity
- Camtasia
- Chrome
- Firefox
- iTunes
- Java
- Microsoft Office - Word, Excel, PowerPoint & Outlook
- Read&Write
- Safari
- Snagit
- SSU PowerPoint Templates
- Stuffit Expander
- VLC
- Zoom
Windows 11 Education
- 7-Zip
- Adobe Acrobat Reader DC
- Adobe Creative Cloud Application Manager
- Chrome
- Edge Chromium
- Firefox
- Java
- KeePass
- Microsoft Office - Word, Excel, PowerPoint & Outlook
- Notepad++
- VLC
- Zoom
Computer Platforms (Hardware)
Note: Product links in the following tables do not always display the exact specifications of the product you will receive. Each model has been customized to meet SSU requirements.
| Model | Display | CPU | Ram | Disk Size | Optical Drive | Video | Camera |
|---|---|---|---|---|---|---|---|
| M2 Mac Mini | 24" Dell P2423D Monitor (Resolution 2560x1440) | Apple M2 chip | 16GB | 256GB SSD Hard Drive | None | Apple M2 Integrated GPU | None |
| 13" M2 MacBook Air | 13.6" Liquid Retina display with True Tone | Apple M2 | 8GB | 256GB SSD Hard Drive | None | Apple M2 Integrated GPU | FaceTime HD camera |
| Model | Display | CPU | Ram | Disk Size | Optical Drive | Video | Camera |
|---|---|---|---|---|---|---|---|
| PC Desktop: Dell OptiPlex SFF | 24" Dell P2423D Monitor (Resolution 2560x1440) | Intel 13th Gen i5-13500 | 16GB | 256GB SSD | None | Intel 13th Gen i5-13500 Integrated Graphics | None |
| PC Laptop: Dell Latitude 5440 | 14" 1920x1080 Full HD IPS Display | 13th Gen Intel Core i5-1335U | 16GB | 256GB SSD | None | 13th Gen Intel Core i5-1335U Integrated Graphics | Integrated Webcam |
Handheld Device Hardware Support
IT does not currently support Handheld Devices. IT does not offer any support on Smart Phones or Handheld Devices aside from basic Email setup and WiFi connectivity.
Operating Systems
| Operating System | Level of Support |
|---|---|
| macOS 14.x (Sonoma) | Recommended |
| macoOS 13.x (Ventura) | Recommended |
| macOS 12.x (Monterey) | Supported |
| macoOS 11.x (Big Sur) | Unsupported |
| Mac OS 10.15 (Catalina) | Unsupported |
| Mac OS 10.14 (Mojave) | Unsupported |
| Mac OS 10.13 (High Sierra) | Unsupported |
| Mac OS 10.12 (Sierra) | Unsupported |
| Operating System | Level of Support |
|---|---|
| Windows 11 Education | Recommended |
| Windows 10 Education | Supported |
| Windows 8 | Unsupported |
| Windows 7 | Unsupported |
| Windows XP | Unsupported |
Unix
People using Unix systems (including all variants of Unix, Linux, Solaris, etc.) must demonstrate administrative competence and responsibility. Support will be offered on a case-by-case basis. IT reserves the right to perform periodic security audits of any Unix computer on campus, and terminate network access if/when security becomes a problem.
Improperly configured Unix-based computers present a substantial security hazard for the entire campus.
External Hardware - Recommended & Pre-approved
The following devices have been reviewed by IT and are recommended for most users in common situations. If you have questions about compatibility with your computer, contact the IT Help Desk. For help with purchasing external hardware, visit CSUBUY Procure-to-Pay (P2P) | Financial Services at Sonoma State University.
| Type | Compatibility Note | Recommended Model |
|---|---|---|
| PC Docking Stations | Depends on machine. Our standard HP and Dell Laptops use these. | HP USB-C Docking Station G5, Dell WD15 Monitor Dock 4K with 130W Adapter, USB-C |
| Mac Docking Stations | Depends on machine. Our standard Mac Laptop would work with this. | USB C Hub, 12 in 1 Multi-Port USB 3.0, Secure Docking Station with Charging Power, Audio, 4K HDMI, VGA, Gigabit Ethernet, Micro/SD Card Reader for iMac Pro, Chromebook, MacBook Pro 2018, 2017, 2016 |
| Phone headset | Leitner LH270 Single-Ear Wireless Telephone Headset for Office Phones | |
| USB Thumb Drive | Samsung 32GB BAR (METAL) USB 3.0 Flash Drive (MUF-32BA/AM) | |
| Encrypted Thumb Drive | Encrypted Flash Drive,DualAxon Password Protected Flash Drive Adopting Hardware Encryption Digital Keypad Metal Shell(16GB) | |
| Speakers | Logitech Multimedia Speakers Z200 with Stereo Sound for Multiple Devices - Black | |
| Ergonomic Keyboard | Microsoft Natural Ergonomic Keyboard 4000 for Business - Wired | |
| Ergonomic Mouse | Anker AK-UBA 2.4G Wireless Vertical Ergonomic Optical Mouse, 800 / 1200 /1600 DPI, 5 Buttons for Laptop, Desktop, PC, Macbook - Black | |
| USB Optical Drive | ROOFULL USB 3.0 External DVD Drive with Protective Storage Carrying Case Bag, Portable CD DVD +/-RW Drive Burner, Compatible for Windows 10/8/7 Laptop Computer Mac Macbook Pro HP Dell Asus Acer Lenovo | |
| Dongles | Used for our standard MacBook Pro | HooToo USB C Hub, USB C Adapter with Ethernet Port, 4K HDMI, 100W Power Delivery, 3 USB 3.0 Ports for MacBook Pro & Google Chromebook & and More Type C Laptops - Silver |
| Web Cam | Logitech C920S Pro HD Webcam with Privacy Shutter - Widescreen Video Calling and Recording, 1080p Camera, Desktop or Laptop Webcam, Black_with Shutter |
Zoom web conferencing includes an option that allows meeting hosts to provide closed captions for a meeting. Once enabled, the meeting host can assign the captioning function to a designated meeting participant. That captioner can then transcribe (type) the conversation into the CC tool. The closed captions are available to all meeting participants.
To enable captions:
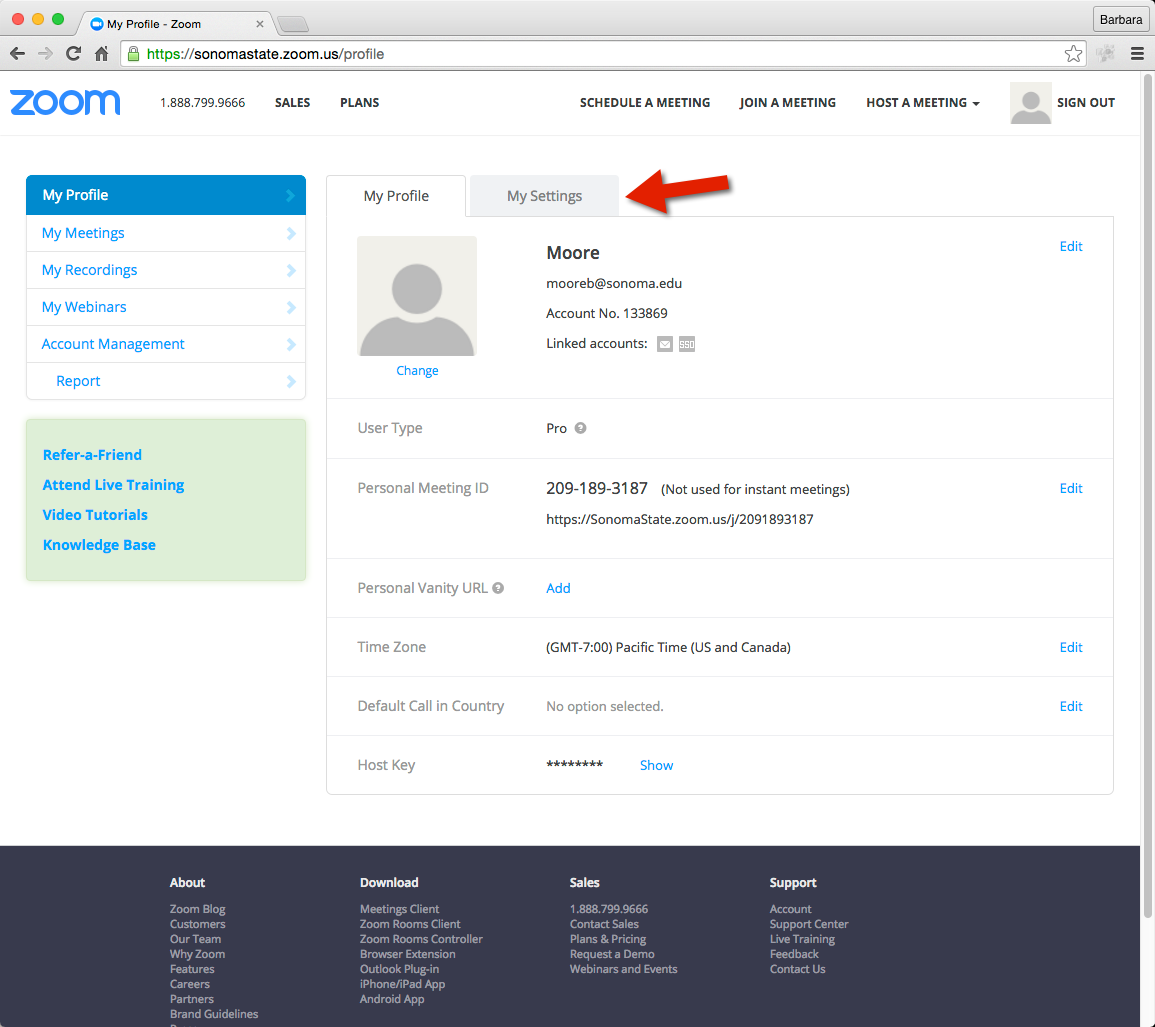
- Login to sonomastate.zoom.us.
- Use your SSU Seawolf username and password to authenticate.
- In your Zoom profile, click the My Settings tab [view screenshot of step 3].
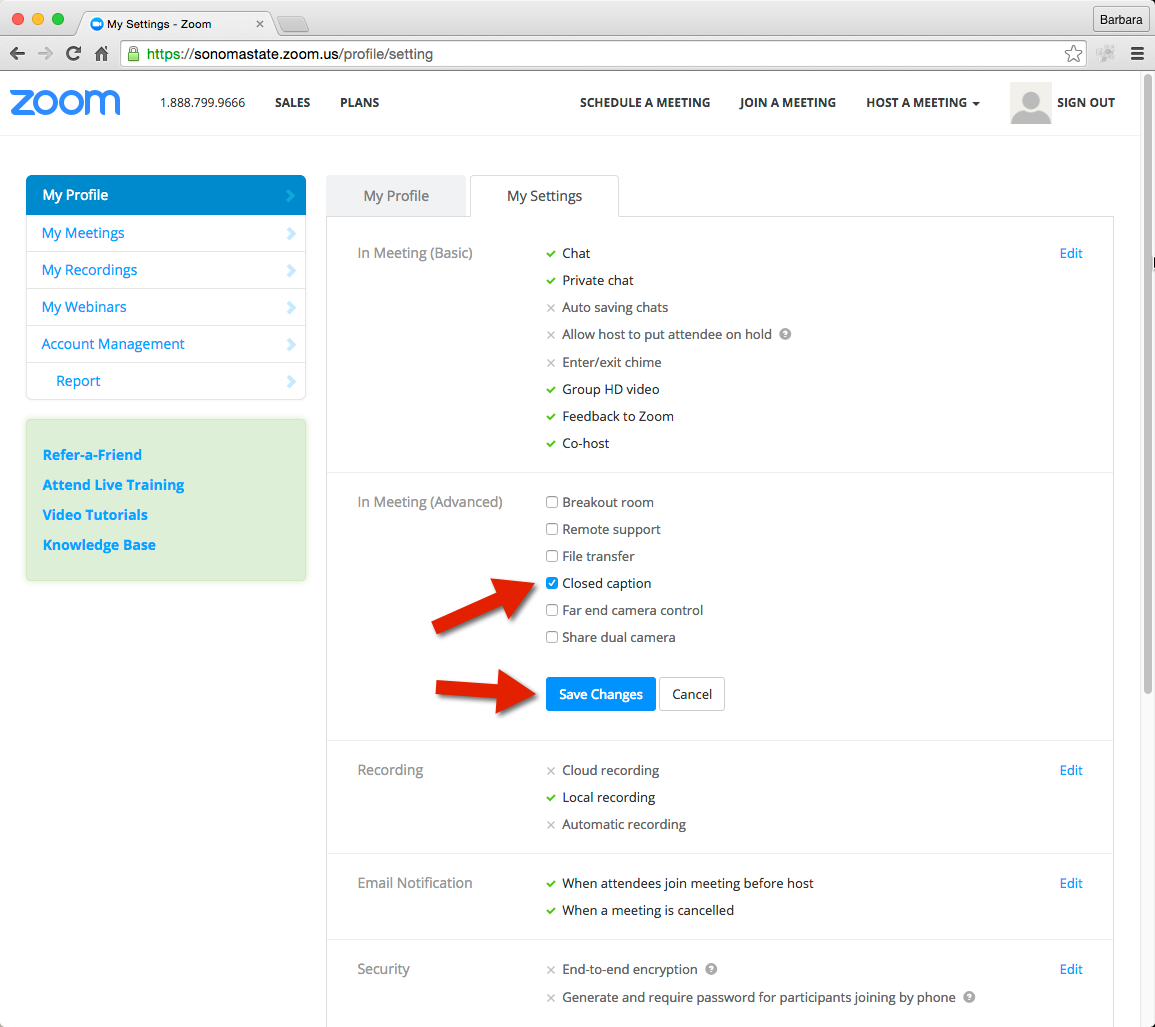
- In the section labeled In Meeting (Advanced), click Edit [view screenshot of step 4].
- Check Closed Caption [view screenshot of step 5 and 6].
- Click Save.

All students and employees have access to Zoom and can set up meetings. Anyone in the world can be invited to and join a Zoom meeting, but only a host can start or schedule meetings. To access your Zoom account profile, login to Online Services, then click the Zoom button. To ensure you are also properly logged into the Zoom application on your computer, please see our additional support page.
Faculty using Canvas can schedule Zoom meetings in their courses using the Zoom Meeting activity.
Zoom Support Resources
- For more information about using Zoom, see SSU's Zoom homepage.
- Zoom provides a variety of helpful Support Topics, Video Tutorials, and Quickstart Guides on their Support Site.
- Additional quick answers can be found on Zoom's Frequently Asked Questions (FAQ).
- Zoom requires that all meetings have a Passcode or a Waiting Room enabled by default. Further information can be found on Zoom's FAQ.
Zoom Webinars
Meeting and Webinar platforms offer similar features and functionality but have some key differences. A full feature comparison can be found on Zoom's Meetings & Webinars FAQ.
- Zoom Meetings support up to 300 participants. If your event needs to support more than 300 participants, a Webinar is appropriate.
- SSU has a very limited number of Webinar licenses. Access to the Webinar hosting feature is typically provided on a temporary basis in order to balance needs for the entire campus.
To discuss setting up a Webinar, please contact the IT Help Desk.
(For Zoom Phone info, please visit our Zoom Phone Overview.)
Software Standards
Core Software Applications - Faculty Workstations
This is a list of software installed on standard Faculty workstations delivered by IT.
Macintosh - MacOS Sonoma (14) and Newer
- Adobe Acrobat Reader DC
- Adobe Creative Cloud Application Manager
- Audacity
- Camtasia
- Chrome
- Firefox
- Google Drive
- iTunes
- Java
- Microsoft Office - Word, Excel, PowerPoint & Outlook
- Read&Write
- Safari
- Snagit
- SSU PowerPoint Templates
- VLC
- Zoom
Windows 11 Education
- 7-Zip
- Adobe Acrobat Reader DC
- Adobe Creative Cloud Application Manager
- Chrome
- Edge Chromium
- Firefox
- Java
- KeePass
- Microsoft Office - Word, Excel, PowerPoint & Outlook
- Notepad++
- VLC
- Zoom
Core Software Applications - Staff Workstations
This is a list of software installed on standard Staff workstations delivered by IT.
Macintosh - MacOS Sonoma (14) and Newer
- Adobe Acrobat Reader DC
- Adobe Creative Cloud Application Manager
- Audacity
- Camtasia
- Chrome
- Firefox
- iTunes
- Java
- Microsoft Office - Word, Excel, PowerPoint & Outlook
- Read&Write
- Safari
- Snagit
- SSU PowerPoint Templates
- Stuffit Expander
- VLC
- Zoom
Windows 11 Education
- 7-Zip
- Adobe Acrobat Reader DC
- Adobe Creative Cloud Application Manager
- Chrome
- Edge Chromium
- Firefox
- Java
- KeePass
- Microsoft Office - Word, Excel, PowerPoint & Outlook
- Notepad++
- VLC
- Zoom
Computer Platforms (Hardware)
Note: Product links in the following tables do not always display the exact specifications of the product you will receive. Each model has been customized to meet SSU requirements.
| Model | Display | CPU | Ram | Disk Size | Optical Drive | Video | Camera |
|---|---|---|---|---|---|---|---|
| M2 Mac Mini | 24" Dell P2423D Monitor (Resolution 2560x1440) | Apple M2 chip | 16GB | 256GB SSD Hard Drive | None | Apple M2 Integrated GPU | None |
| 13" M2 MacBook Air | 13.6" Liquid Retina display with True Tone | Apple M2 | 8GB | 256GB SSD Hard Drive | None | Apple M2 Integrated GPU | FaceTime HD camera |
| Model | Display | CPU | Ram | Disk Size | Optical Drive | Video | Camera |
|---|---|---|---|---|---|---|---|
| PC Desktop: Dell OptiPlex SFF | 24" Dell P2423D Monitor (Resolution 2560x1440) | Intel 13th Gen i5-13500 | 16GB | 256GB SSD | None | Intel 13th Gen i5-13500 Integrated Graphics | None |
| PC Laptop: Dell Latitude 5440 | 14" 1920x1080 Full HD IPS Display | 13th Gen Intel Core i5-1335U | 16GB | 256GB SSD | None | 13th Gen Intel Core i5-1335U Integrated Graphics | Integrated Webcam |
Handheld Device Hardware Support
IT does not currently support Handheld Devices. IT does not offer any support on Smart Phones or Handheld Devices aside from basic Email setup and WiFi connectivity.
Operating Systems
| Operating System | Level of Support |
|---|---|
| macOS 14.x (Sonoma) | Recommended |
| macoOS 13.x (Ventura) | Recommended |
| macOS 12.x (Monterey) | Supported |
| macoOS 11.x (Big Sur) | Unsupported |
| Mac OS 10.15 (Catalina) | Unsupported |
| Mac OS 10.14 (Mojave) | Unsupported |
| Mac OS 10.13 (High Sierra) | Unsupported |
| Mac OS 10.12 (Sierra) | Unsupported |
| Operating System | Level of Support |
|---|---|
| Windows 11 Education | Recommended |
| Windows 10 Education | Supported |
| Windows 8 | Unsupported |
| Windows 7 | Unsupported |
| Windows XP | Unsupported |
Unix
People using Unix systems (including all variants of Unix, Linux, Solaris, etc.) must demonstrate administrative competence and responsibility. Support will be offered on a case-by-case basis. IT reserves the right to perform periodic security audits of any Unix computer on campus, and terminate network access if/when security becomes a problem.
Improperly configured Unix-based computers present a substantial security hazard for the entire campus.
External Hardware - Recommended & Pre-approved
The following devices have been reviewed by IT and are recommended for most users in common situations. If you have questions about compatibility with your computer, contact the IT Help Desk. For help with purchasing external hardware, visit CSUBUY Procure-to-Pay (P2P) | Financial Services at Sonoma State University.
| Type | Compatibility Note | Recommended Model |
|---|---|---|
| PC Docking Stations | Depends on machine. Our standard HP and Dell Laptops use these. | HP USB-C Docking Station G5, Dell WD15 Monitor Dock 4K with 130W Adapter, USB-C |
| Mac Docking Stations | Depends on machine. Our standard Mac Laptop would work with this. | USB C Hub, 12 in 1 Multi-Port USB 3.0, Secure Docking Station with Charging Power, Audio, 4K HDMI, VGA, Gigabit Ethernet, Micro/SD Card Reader for iMac Pro, Chromebook, MacBook Pro 2018, 2017, 2016 |
| Phone headset | Leitner LH270 Single-Ear Wireless Telephone Headset for Office Phones | |
| USB Thumb Drive | Samsung 32GB BAR (METAL) USB 3.0 Flash Drive (MUF-32BA/AM) | |
| Encrypted Thumb Drive | Encrypted Flash Drive,DualAxon Password Protected Flash Drive Adopting Hardware Encryption Digital Keypad Metal Shell(16GB) | |
| Speakers | Logitech Multimedia Speakers Z200 with Stereo Sound for Multiple Devices - Black | |
| Ergonomic Keyboard | Microsoft Natural Ergonomic Keyboard 4000 for Business - Wired | |
| Ergonomic Mouse | Anker AK-UBA 2.4G Wireless Vertical Ergonomic Optical Mouse, 800 / 1200 /1600 DPI, 5 Buttons for Laptop, Desktop, PC, Macbook - Black | |
| USB Optical Drive | ROOFULL USB 3.0 External DVD Drive with Protective Storage Carrying Case Bag, Portable CD DVD +/-RW Drive Burner, Compatible for Windows 10/8/7 Laptop Computer Mac Macbook Pro HP Dell Asus Acer Lenovo | |
| Dongles | Used for our standard MacBook Pro | HooToo USB C Hub, USB C Adapter with Ethernet Port, 4K HDMI, 100W Power Delivery, 3 USB 3.0 Ports for MacBook Pro & Google Chromebook & and More Type C Laptops - Silver |
| Web Cam | Logitech C920S Pro HD Webcam with Privacy Shutter - Widescreen Video Calling and Recording, 1080p Camera, Desktop or Laptop Webcam, Black_with Shutter |