
Email, Calendar
Your preferred email address and display name will migrate automatically to your Google account. However, if you would like to make changes to these in the future, you will need to follow the steps outlined below. Any changes that you attempt to make in from within Gmail directly will be overridden when our nightly server load runs.
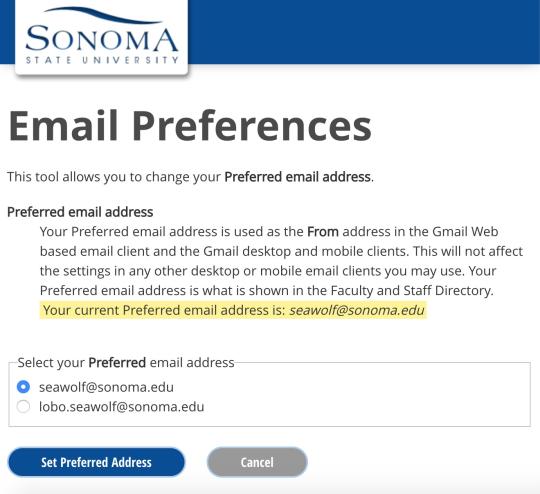
Preferred Email Address
- From your online portal, click on the My Email Addresses tile.
- Click on the radio button next to your preferred email address.
- Click Set Preferred Address.
Google Display Name
Student Instructions
- From your online portal, click on the MySSU tile.
- Click on Student Center.
- Under the Personal Information section, click on the Names link.
- On the row that shows your Preferred name, click on the pencil/edit icon to the right of it.
- Make whichever changes you need to your display name and click Save. Please allow 24 hours for this change to be fully reflected across our system.
Staff and Faculty Instructions
- You will need to contact HR to request a change to your display name. They can be reached via phone at (707) 664-3100, or via email at hr@sonoma.edu.
- Open the Settings app and tap "Accounts" in the list of settings.
(Depending on your device, this item may be called "Users and accounts", "Cloud and accounts" or something similar instead.) - Tap "Add account".
(If you don't see this option, you may have to tap "Accounts" again first before you do so.) - Tap "Google".
- Enter your SSU email address and tap "Next".
(Note: If you have previously configured your Exchange email account on the Gmail app, you will need to remove that account first before proceeding.) - Tap "Accept".
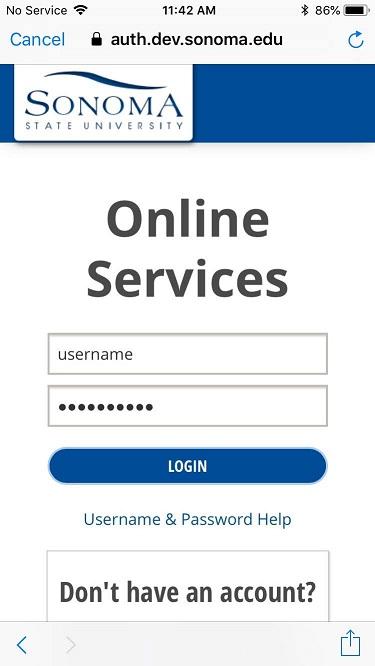
You will be taken to the sonoma.edu login page to log into your SSU account. - Enter your username and password in the appropriate fields and tap "Login".
- Google may ask if you would like to back your device up to Google Drive. Make sure this is toggled OFF (see the picture below).
Then, tap "Accept" to complete the configuration process. - Your Google account should now be fully configured on your Android device. Your email, calendar items and contacts can be viewed and edited within the Gmail, Calendar and Contacts apps, respectively.
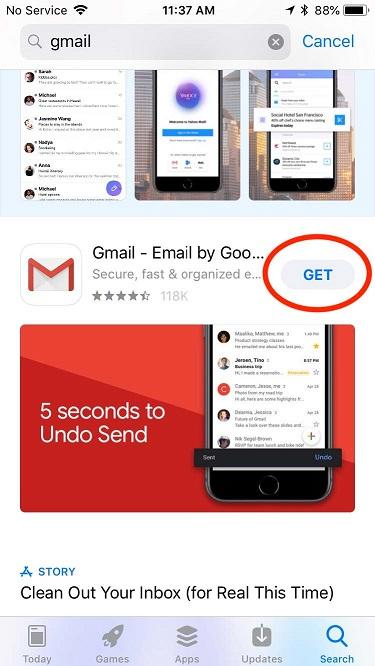
- If you have not already installed the Gmail app, open the App Store app and search for "Gmail". Locate the app entitled "Gmail - Email by Google" and tap the "Get" button next to it.
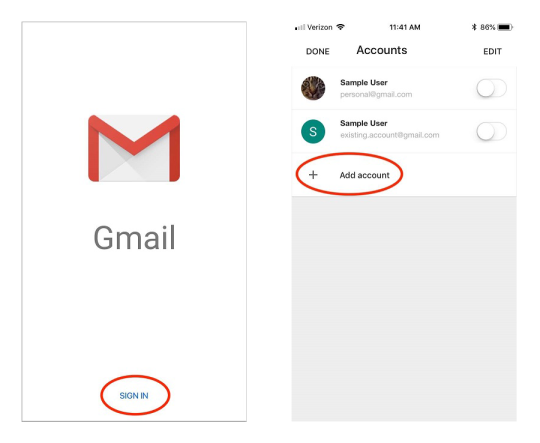
- Open the Gmail app and tap "Sign in" if prompted, then tap "Add account" on the following screen.
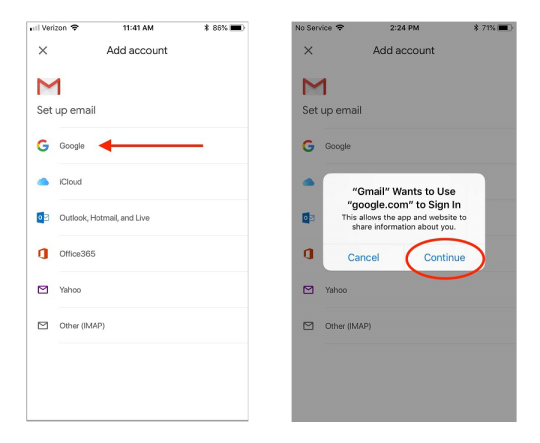
- Select "Google" from the list of providers. A popup will tell you that "Gmail" wants to use"google.com" to sign in - tap "Continue".
- Enter your SSU email address in the "Sign in" field and tap "Next".

- You will now be prompted to log into your account again via Online Services. Enter your username (without the '@sonoma.edu') and password, and tap "Login".
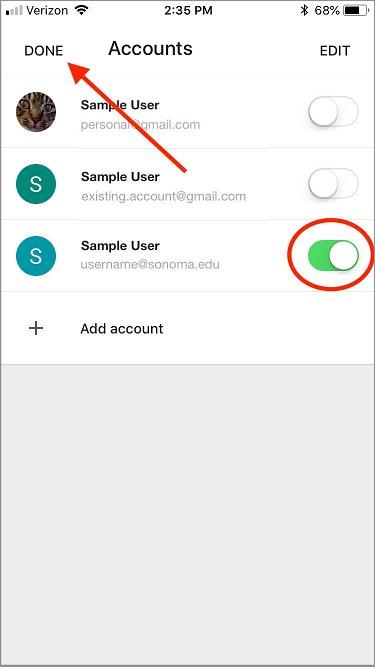
- Once logged in, you should now see your SSU email account appear in the list of accounts. Make sure that the slider next to it is green, and tap "Done".
- Gmail will ask you if you want to turn on Notifications. Tap "Allow" or "Don't Allow" depending on your preference.
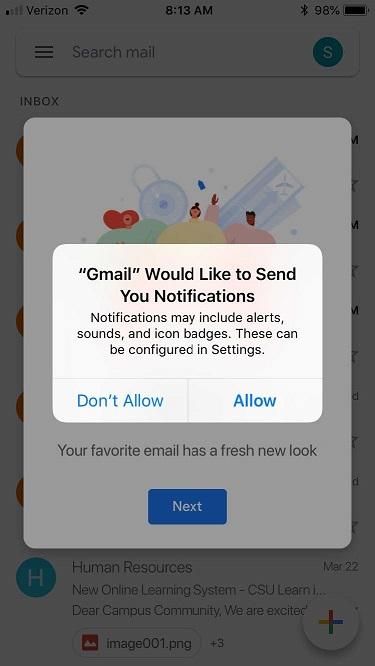
- You may be shown a splash screen that says "Gmail has a fresh new look." Tap "Next", and you will then be asked to choose between 3 different views that show varying levels of detail. Tap "OK" once you've made your selection.

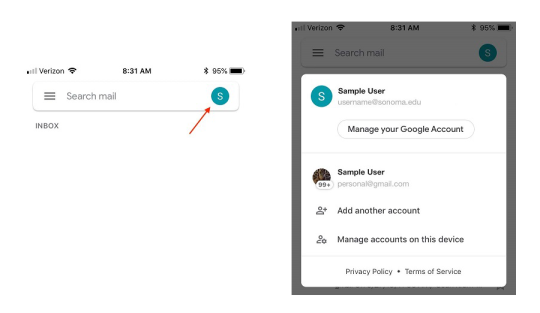
- Your email should now be all set up! If you have other accounts on the Gmail app, you can tap the circle with your initial in the top-right of the screen to switch between them.
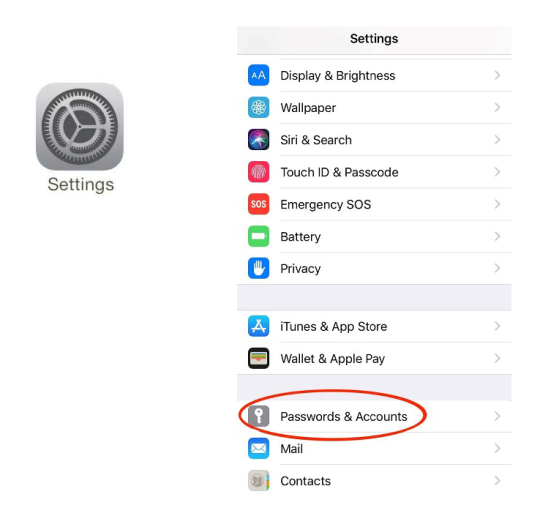
- If you want to sync your Calendar items and Contacts to your device as well, you can open your Settings app, scroll down to "Passwords & Accounts" and tap it.
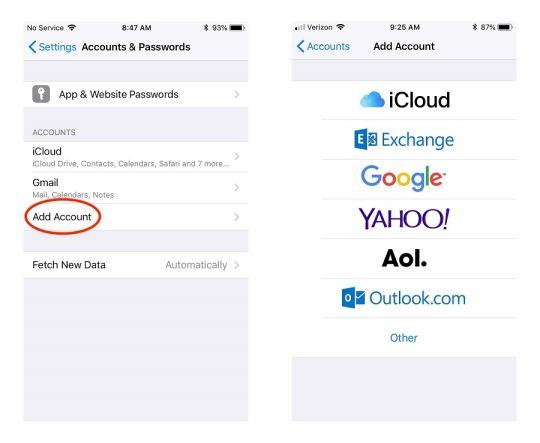
- Tap "Add Account", then select Google from the list that follows.
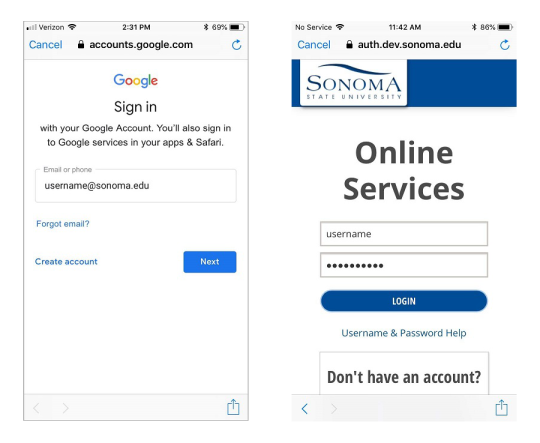
- Just as you did earlier, you will need to sign into your Google account. Enter your email address and tap "Next" when prompted, then sign into your SSU Online Services using your username and password. Tap "Login" once you're done.
- Make sure Contacts and Calendars are both toggled ON in the list that follows, and that Mail is toggled OFF. Then tap "Save". Your calendar items and contacts should now populate locally on your iOS device.

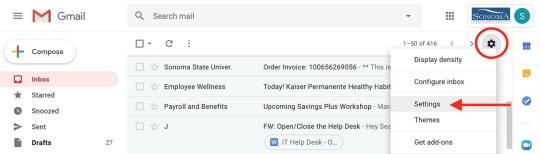
Log into your Gmail account using the web interface and click on the gear icon located near the top-right of the screen. Select "Settings" from the menu that appears.
Below the word "Settings", click on the "Forwarding and POP/IMAP" subheading. Scroll down to the "IMAP access" setting and click the radio button next to "Enable IMAP".
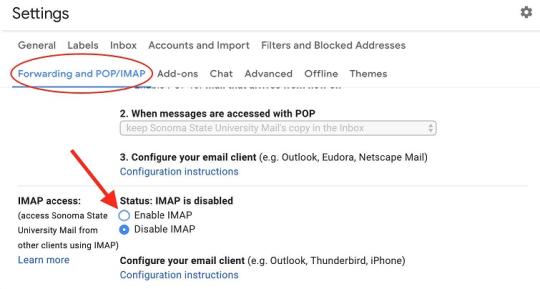
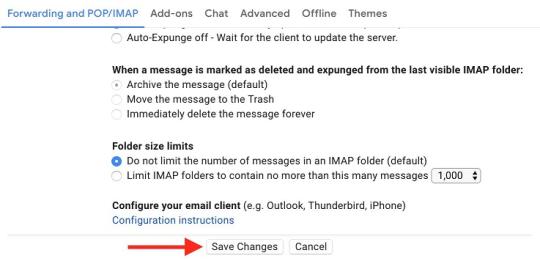
Click "Save Changes". Your Gmail account is now ready to be configured on an external client.
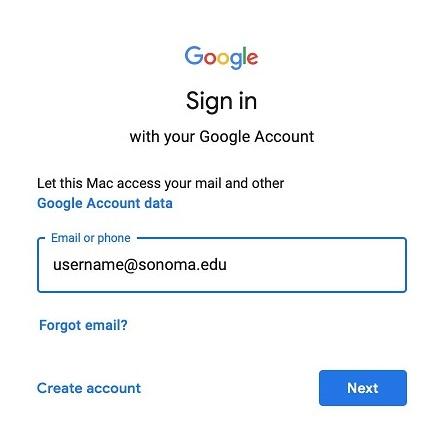
Open the Mail application. From the list of providers, select the radio button next to "Google" and click "Continue".

Enter your SSU email address and click "Next".
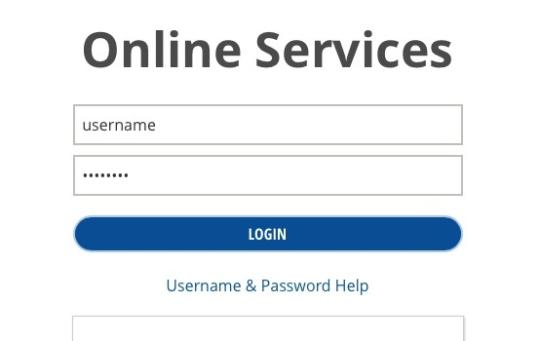
You will be prompted to log into your SSU account again via the web. Enter your username (without the '@sonoma.edu') and password and click "Login".
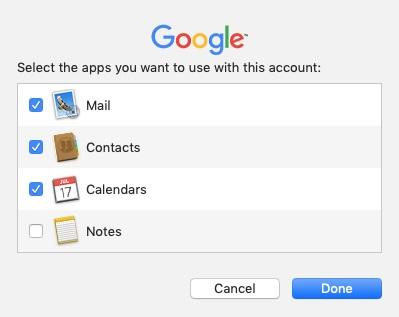
You will then be prompted to select whether you want your contacts, calendar items, and notes to populate to their respective apps on your Mac. Check the boxes next to each app you would like to use with your SSU account and click "Done".
- Your email should now be in the process of saving locally to your machine. This may take a while if you have a particularly large mailbox, so please be patient!
NOTE: The following set of steps will enable you to access mail, contact and calendar data from your Gmail account in Outlook, but may be very time-consuming if you have a lot of mail in your account. There is a separate process you can use that is much quicker to set up, but will not allow you to access contact or calendar data.
If Outlook is currently open, make sure to fully quit out of the application before continuing.
NOTE: The Synchronization Status window is set to automatically appear each time you launch Outlook, as the program will need to pull down any new data from your Google account and save it locally. You can uncheck the box next to “Open this window when Microsoft Outlook starts” to prevent this window from appearing in the future.
- Download a program from Google called G Suite Sync
- Run the installer that downloads by clicking on it in your Downloads bar. If it prompts you for permission to make changes to your device, click “Yes”.
- Click on the Windows icon in the bottom-left corner of the screen and start typing the words “G Suite Sync”. You should see an option highlight that says “Set up a G Suite Sync user.” Click on this.
- Enter your email address and click "Continue".
- A browser window will open asking you to choose an account from sonoma.edu. Click on your account in the list (you may be prompted to sign in to your SSU Online Services as well).
- You will be told that G Suite Sync for Microsoft Outlook wants to access your Google Account. Scroll to the bottom of the page and click “Allow”.
- The G Suite Sync application will now prompt you to create a new profile in Outlook. Leave the “Import data from an existing profile” box unchecked and click “Create profile”.
- Click “Start Microsoft Outlook”.
- Outlook will open and prompt you to choose a profile. Select your brand new G Suite profile from the drop-down menu if it is not already selected, and click “OK”.
- Your email, contacts and calendar will now begin syncing to your computer. A window will pop up showing the status of this process. Note that this step may take a while depending on the size of your email account.
- When the process is complete, you will be able to click “Close”.
NOTE: You may see a message that your email “synced with errors”. One likely cause of this is if you have labels in Gmail that share the same name with automatically-created folders in Outlook, like “Contacts” or “Sent Items”. As Outlook will put such items in the proper locations for you, you can safely ignore this error message.
- Your email, contacts and calendar items should now properly appear in Outlook!
Gmail Setup for Outlook on PC (Mail Only)
The following steps describe an alternative method of configuring Gmail to work with Microsoft Outlook. While this process does not require your entire email account to fully synchronize with Outlook before use, please take note that your contacts or calendar items will not be available in Outlook if you choose this method. However, if this does not bother you and you simply want to get up and running quickly with your email alone, give the following steps a try.
- Log into your Gmail account using the web interface and click on the gear icon located near the top-right of the screen. Select "Settings" from the menu that appears.
- Below the word "Settings", click on the "Forwarding and POP/IMAP" subheading. Scroll down to the "IMAP access" setting and click the radio button next to "Enable IMAP".
- Click "Save Changes".
- Now, scroll to the top of the page and click on the icon near the top-right that looks like a 3 by 3 grid of dots. Then, from the pane that pops up, click on "Account".
- On the sidebar on the left of the screen, click "Security".
- Scroll down to the section entitled "Less secure app access" and click on the link that says "Turn on access (not recommended)".
- Click on the toggle button to turn the "Allow less secure apps" setting ON.
- Launch Microsoft Outlook. Click on the File tab at the top of the screen, then click the "Add Account" button.
- On the "Add Account" window that appears, select the radio button next to "Manual setup or additional server types", then click "Next >".
- Select the radio button next to "POP or IMAP" and click "Next >".
- Fill in the fields with the following information. When you're done, click on the "More Settings..." button.
Your Name: (your name)
Email Address: (your email address)Account Type: IMAP
Incoming mail server: imap.gmail.com
Outgoing mail server (SMTP): smtp.gmail.comUser Name: (your email address)
Password: (your password) - On the window that appears, click on the Outgoing Server tab and check the box next to "My outgoing server (SMTP) requires authentication". Make sure that the radio button next to "Use same settings as my incoming mail server" is selected.
- Click on the Advanced tab. In the Server Port Numbers section at the top, set the following values:
Incoming server (IMAP): 993
Use the following type of encrypted connection: SSL
Outgoing server (SMTP): 465
Use the following type of encrypted connection: SSL(You can leave all of the other settings alone.)
Click "OK".
- Click "Next >" one final time. Outlook will attempt to log onto this account and send a test email message, and a window will appear showing whether these attempts have succeeded or failed. If they've failed, go back and make sure that you've input all of the necessary information correctly. Either way, you can click "Close" once these tests have finished running.
- The setup process is now complete! You should gradually start to see your old emails populate in Outlook.
Beginning May 24th, we will be using Google Groups as our platform for all Sonoma State mailing lists. This page contains information on how mailing lists are used, which types are used on campus, and how to request the creation of new lists, in addition to documentation links that explain how to perform common administrative tasks in Google Groups.
What are mailing lists?
A mailing list system allows people to send email to one address, whereupon their message is copied and sent to all of the other subscribers to the mail list. In most cases, individuals must subscribe to a mailing list in order to participate, and must unsubscribe if they wish to stop receiving email from the list.
Sonoma State University supports the following two types of mailing lists:
- General Use: May be created to support subjects of interest to the University or to University groups. Faculty, staff or students may request that such lists be established.
- Academic Dept. Announce Lists: Designed for departments to send important information that students need. These lists are not individually subscribed; instead, they will have a single subscription for all majors of a given department. Admins can add faculty and other department staff as desired. The standard name format for these lists is as follows: dept-announce @ sonoma.edu.
How can I request a new mailing list?
To request the creation of a mailing list, contact the IT Help Desk, or submit a SFBRN Service Now Help Ticket, with the following information:
- Whether it's an discussion list or an announce list (that is, whether anybody on the list should be able to send messages to it, or only specific people)
- Who Can Join (Invite only, anyone can ask, anyone @sonoma.edu, Anyone anywhere)
- Allow external members (outside @sonoma.edu)
- Who can leave (Nobody, Any member, Managers and Owners only)
- The desired list email address (@lists.sonoma.edu)
- A proposed title for the list
- The primary administrators and moderators (if any)
- A description for the list
How do I manage my mailing lists in Google Groups?
You can access your groups directly by following this link. Alternatively, you can click on any of the Google icons on your portal page (Mail, Calendar or Drive), then click on the
icon near the top-right of the screen. Click "More" at the bottom of the pane that pops up, and finally click on the "Groups" icon.
You can make a template in Gmail for messages that you send frequently.
First - Enable Templates
- Login to Online Services and click Email.
- At the top right, click Settings, and then click See all settings.
- At the top of the page, click Advanced.
- In the Templates section, select Enable.
- At the bottom, click Save Changes.
Create a Template
Compose to create a new message that will become the template.
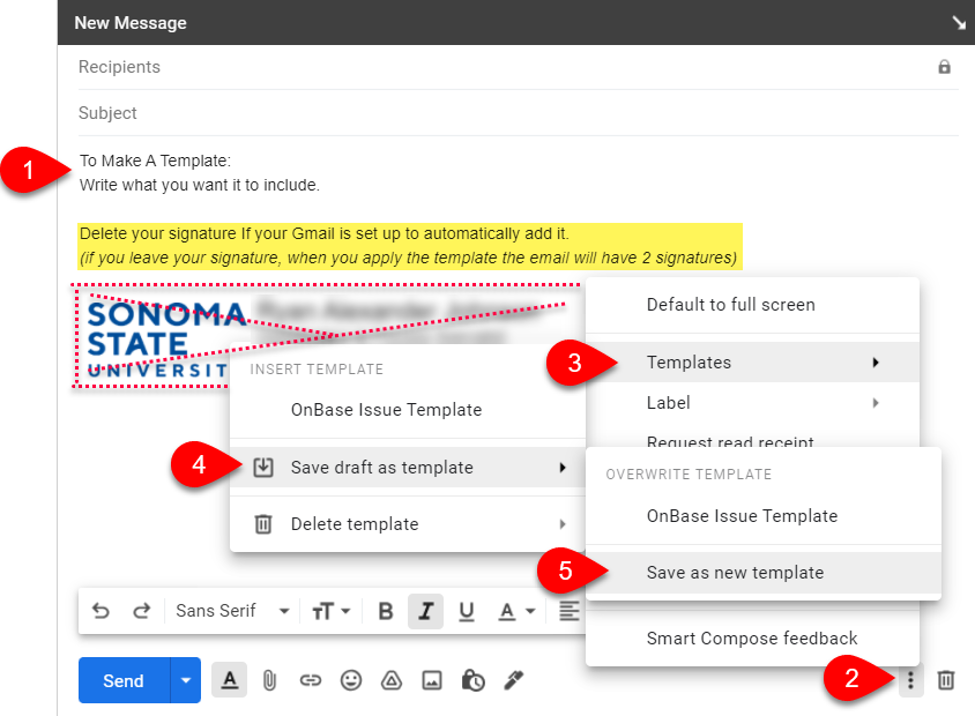
- Fill out the parts of the message that you want included in the template. This might include:
- Recipients (if the message is always sent to the same recipients)
- Subject
- Message
- Message formatting
- Attachment
- To save the message as a template, click More options (2 vertical dots near the Trash icon).
- Click Templates.
- Click Save draft as template.
- Click Save as new template.
- By default, the new template will use the Subject for the template name. If the Subject is blank, you'll be able to add a template name.
Use a Template
Once a template has been saved, you can use it when you compose a new message.
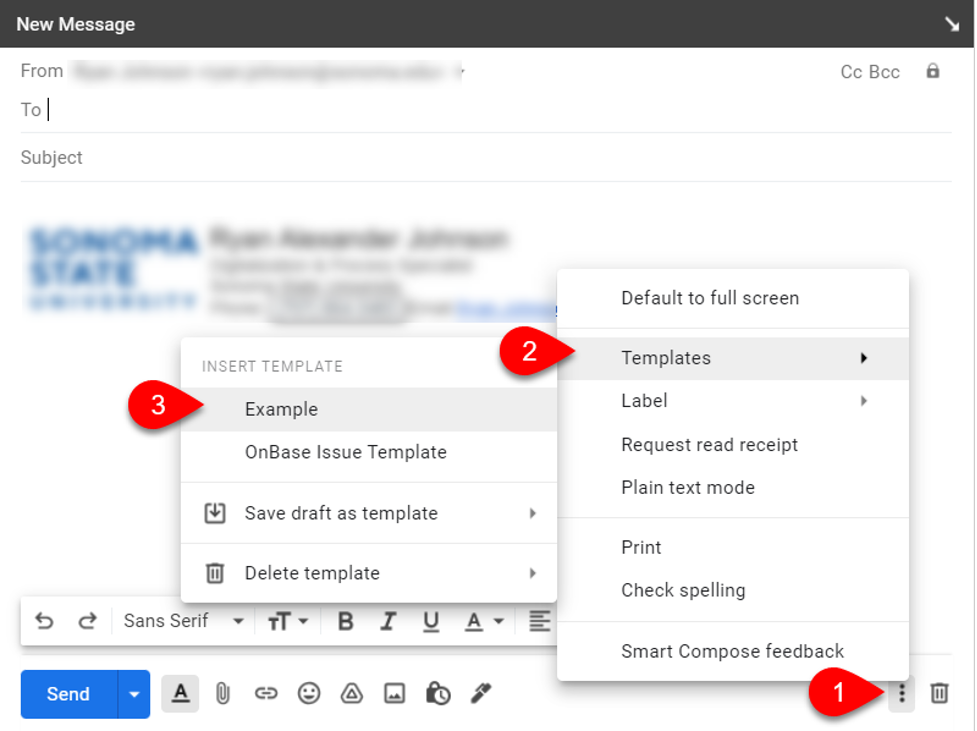
- In the New Message, click More options.
- Click Templates.
- Click the template you wish to use.
- Add or edit the new message as needed.
- Send.
This page contains links to resources that show you how to fully configure your new Gmail account. It also contains useful information about Gmail, as well as links to training tools that can help you get familiar with the Gmail interface.
How can I customize my Gmail experience?
The following links explain how to set up your Google Mail, Contacts and Calendar beyond what the migration process will do for you automatically:
Common configuration steps
- Create a single signature
- Create multiple signatures
- Set up your out-of-office or vacation auto-reply
- Create rules to filter your emails
- Delegate your email
- Delegate your email (video tutorial)
- Share or delegate your calendar
- Share or delegate your calendar (video tutorial)
- Add a room to a calendar event
- Use, create and delete labels
- Turn email notifications on or off
- View, group & share contacts
Other useful information
- Use Gmail offline
- Change your display name
- Change your preferred email address
- Flag a message as important
- Report, mark and block spam/suspicious emails
- Create a calendar for a room or shared space
- Customize the user interface:
Additional learning resources
- You can search the Gmail Help Center for answers to any other Gmail-related questions you may have.
- Google also provides an extension for Chrome called G Suite Training that enables you to browse and view brief, interactive tutorial videos directly within the Google interface. Instructions for installing and using this extension can be found here. (NOTE: Requires Google Chrome.)
- Gmail training videos are available through the CSU Learn tile on your portal page. Simply search for the phrase "Gmail" to view all available videos.
Configuring desktop clients and mobile apps
Google strongly recommends using the web interface to access your email, to guarantee that you will have use of the platform's full functionality. However, if you wish to set up your email on a desktop mail client, you may refer to the following documentation to help you configure it. There are additional instructions for setting up your email on a mobile device, using the Gmail app.
NOTE: Be mindful that certain features of Gmail may not work when utilizing external clients. In particular: sharing calendars, scheduling meetings, creating events and configuring Out-of-Office messages are known to present issues outside of the web interface. Use the following at your own risk.
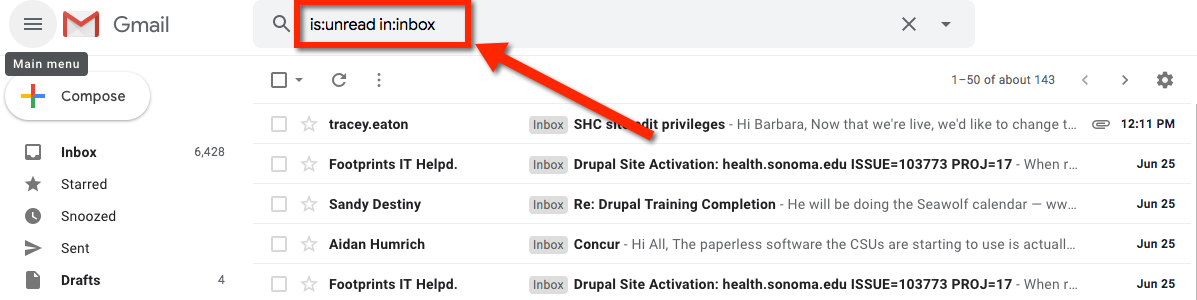
Search Filters
You can use the search bar at the top of the Gmail page to filter for unread messages, or messages with a variety of attributes.
- is:unread
- displays all messages in your account that are unread
- is:unread in:inbox
- filters your inbox to display only unread messages
- is:unread in:inbox label:important
- filters your inbox to display only unread messages that are labeled "important"
- is:unread from:sally
- displays all unread messages from anyone named "sally"
"is", "in", "label" and "from" are just a few of the many operators you can use in the search bar to filter and find messages. For more information and examples, see Search operators you can use with Gmail.
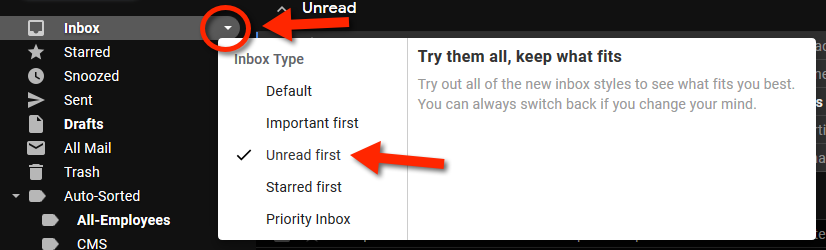
Inbox Layout - Unread First
You can also set your Inbox so that unread messages always appear on top. To do this click on the down caret next to Inbox and select "Unread first". For more information on customizing your Inbox view check out the Change your Gmail inbox layout page.
For a complete list of available privacy and security information, here is Google’s commitment to Privacy and Security, specifically for education.
Detailed Terms of Service agreements for G Suite: